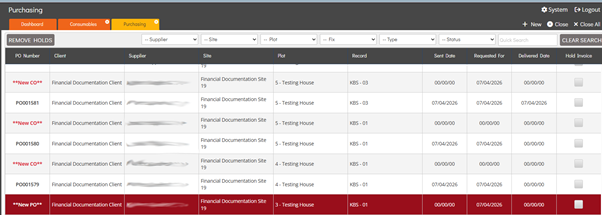
Purchasing
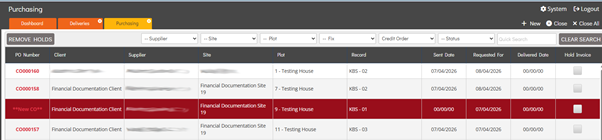
The Purchasing area allows users to Create, Edit, and Delete Purchase Orders, Credit Orders & Pre-Orders against Plot Build Stages for a specific Site. Purchase Orders are used to order Materials associated with the selected Build Stage.
Purchasing Filters & Sorting
The Purchasing area includes a range of filters, described below:
- The Purchasing table contains two dropdown filters: Type & Status.
- Type – This dropdown filter provides three options: Purchase Order, Credit Order, and Pre-Order.
- When Purchase Order is selected, only Purchase Orders are displayed, excluding Credit Orders and Pre-Orders.
- When Credit Order is selected, only Credit Orders are displayed, excluding Purchase Orders and Pre-Orders.
- When Pre-Order is selected, only Pre-Orders are displayed, excluding Purchase Orders and Credit Orders.
- Status – The Status dropdown filter provides six options: Pending, Requested, Approved, Partially Delivered, Delivered & Held.
- Pending – When this option is selected, the Purchasing table is filtered to display only Purchase Orders that have been created but have not yet been assigned a Requested For date.Requested – When this option is selected, the Purchasing table is filtered to display only Purchase Orders that have been created and assigned a Requested For date but have not yet been sent.Approved – When this option is selected, the Purchasing table is filtered to display only Purchase Orders that have been created and sent, but not yet fully delivered.Partially Delivered – When this option is selected, the Purchasing table is filtered to display only Purchase Orders where some Materials have been delivered, but the order has not yet been fully delivered.Delivered – When this option is selected, the Purchasing table is filtered to display only Purchase Orders that have been fully delivered, meaning the Delivered checkbox has been selected on the Purchase Order Details page.
- Held – When this option is selected, the Purchasing table is filtered to display only Purchase Orders that have the Hold Paying Invoice checkbox selected on the Purchase Order Details page.
- Type – This dropdown filter provides three options: Purchase Order, Credit Order, and Pre-Order.
Located next to the dropdown filters is a Filter button. When selected, a filter popup is displayed containing multiple filters that can be used in combination with one another, as described below.
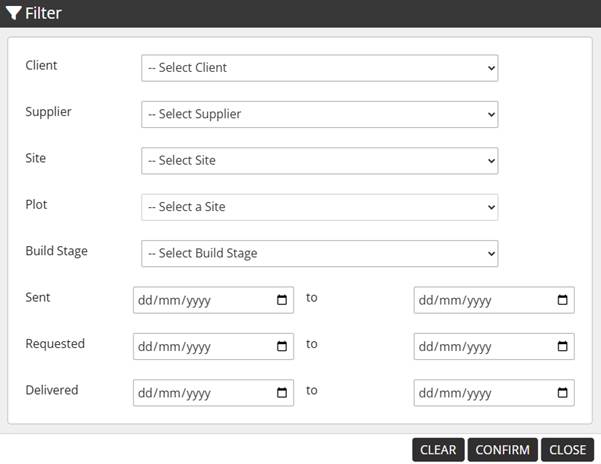
- Client – The Client dropdown lists all Clients in the system, allowing the user to select a specific Client. Once selected and applied, the Purchasing list is filtered to display only Purchase Orders relating to the chosen Client. The Client selection also refines the Site dropdown, limiting it to only display Sites associated with the selected Client.
- Supplier – The Supplier dropdown lists all Suppliers in the system, allowing the user to select a specific Supplier. Once selected and applied, the Purchasing list is filtered to display only Purchase Orders relating to the chosen Supplier.
- Site – The Site dropdown lists all Sites in the system, allowing the user to select a specific Site. Once selected and applied, the Purchasing list is filtered to display only Purchase Orders relating to the chosen Site. The Site selection also populates the Plot dropdown, which lists all Plots associated with the selected Site.
- Plot – The Plot dropdown is initially disabled until a Site is selected. Once a Site has been selected, the Plot dropdown is populated with all Plots associated with that Site. When a Plot is selected and applied, the Purchasing list is filtered to display only Purchase Orders relating to the chosen Plot. The Plot selection also refines the Build Stage dropdown, limiting it to only display Build Stages associated with the selected Plot.
- Build Stage – The Build Stage dropdown displays all Build Stages by default. When a Plot is selected, the Build Stage dropdown is filtered to only display the Build Stages associated with that Plot. When a Build Stage is selected and applied, the Purchasing list is filtered to display only Purchase Orders relating to the selected Build Stage.
- Sent – The Sent filter contains a From and To date selector, allowing the user to define a date range. When applied, this filters the Purchasing table to display only Purchase Orders with a Sent Date that falls within the selected range.
- Requested – The Requested Date filter contains a From and To date selector, allowing the user to define a date range. When applied, this filters the Purchasing table to display only Purchase Orders with a Requested Date that falls within the selected range.
- Delivered – The Delivered Date filter contains a From and To date selector, allowing the user to define a date range. When applied, this filters the Purchasing table to display only Purchase Orders with a Delivered Date that falls within the selected range.
All filters within the Purchasing area work in conjunction with one another, allowing users to progressively narrow down the displayed results. When a filter is applied, the remaining filters are automatically refined so that they only display options relevant to the current filter selections. This ensures that users are only presented with valid and related filter options.
In addition, all filter options are populated from records that currently exist within the Purchasing table. This prevents users from selecting filter combinations that would return no results.
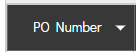
The Quick Search feature allows the user to target the PO Number column.
Each column within the Purchasing table includes sorting functionality. The user can apply sorting by selecting the column header, which displays a white upward-facing arrow to indicate that the column is being sorted in ascending order.

Only one column can be sorted at any given time; if a different column is selected for sorting, the previous sorting selection is removed.
When ascending sorting is active for a column, selecting the column header again will change the indicator to a downward-facing arrow, showing that the column is now sorted in descending order.
Remove Holds
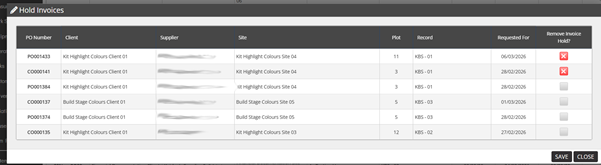
When the Remove Holds button is selected, the system displays the Hold Invoices popup. This allows users to Remove Invoice Holds from Purchase Orders in bulk. The Purchase Orders displayed in this popup are those that have the Hold Paying Invoice checkbox selected on the Purchase Order Details page.
The popup includes multiple columns showing key information for each Purchase Order currently on hold, such as PO Number, Client, Supplier, Site, Plot, Record, and Requested For.
The Remove Invoice Hold? column contains a checkbox for each row. Users can select the checkboxes for the desired Purchase Orders and then select Save to Remove the Invoice Hold.
This action will deselect the Hold Paying Invoice checkbox on the Purchase Order Details page for the selected Purchase Orders.
Creating a Purchase Order
To create a Purchase Order, the user can select the + New button in the top right corner. The system will then navigate to a new Purchase Order record, which opens on the Purchase Order Details page by default.
Purchase Orders can also be created by Operatives & Contract Managers through the Operative Portal.
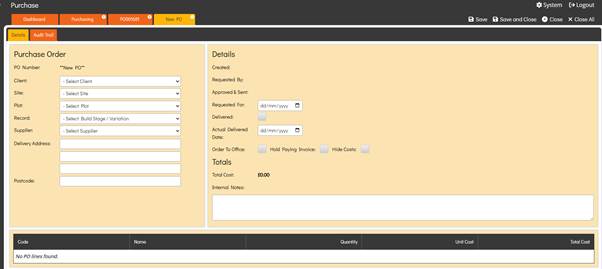
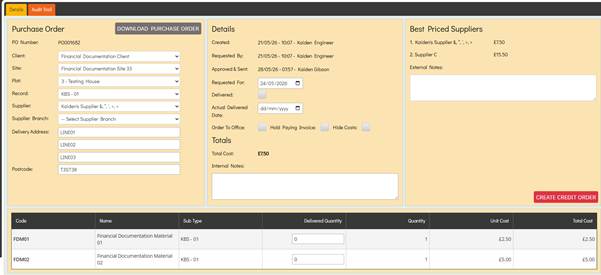
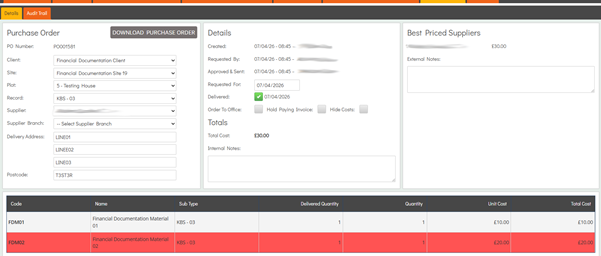
Purchase Order Details
The Purchase Order Details page contains multiple dropdowns, fields, and checkboxes that provide a range of functionality for the Purchase Order, as described below:
- PO Number – When a Purchase Order is created, its PO Number initially displays **New PO**. This is because a PO Number is not assigned until the Purchase Order has been sent, at which point the system automatically generates a number.
- Client – This dropdown lists all non-deleted Clients in the system. Selecting a Client filters the Site dropdown to display only the Sites associated with that Client.
- Site – This dropdown lists all non-deleted, Active Sites associated with the selected Client. Selecting a Site filters the Plot dropdown to display only the Plots created for that Site.
- Plot – This dropdown lists all non-deleted Plots added to the selected Site. Plots that do not contain any Build Stages with Materials available to order are greyed out and cannot be selected. When a Plot is selected, the Record dropdown is filtered to display only the Plot Build Stages that have been added to that Plot.
- Record – This dropdown lists all non-deleted Plot Build Stages and Client Approved Variations assigned to the selected Plot. Build Stages or Variations without any available Materials to order are greyed out and cannot be selected. When a Build Stage or Variation is selected, the Supplier dropdown is populated with the Lead Supplier assigned to it.
- Supplier – This dropdown is automatically populated if a Lead Supplier is assigned to the Build Stage or Variation. Otherwise, it lists all of the Client’s Suppliers that have an assigned Cost for the Materials in the Purchase Order. Changing the Supplier updates the Purchase Order Costs to reflect the selected Supplier’s rates.
- Delivery Address – The Address fields are pre-populated with the selected Site’s Address from the Site’s Details page. These are editable text fields, allowing the user to modify them and enter the appropriate Address for the Purchase Order.
- Postcode – The Postcode field is pre-populated with the selected Site’s Postcode from the Site’s Details page. It is editable, allowing the user to update it with the correct Postcode for the Purchase Order.
- Created – This field is read-only and displays the creator of the Purchase Order along with the Date and Time. The creator could be a Standard Admin user, or an Operative or Contract Manager if the order was created through the Operative Portal.
- Requested By – If the Purchase Order is created on the Admin Site, this field is a dropdown listing all non-deleted users in the system and becomes read-only once the Purchase Order is sent. It also displays the Date and Time the order was requested. If the Purchase Order is created through the Operative Portal by an Operative or Contract Manager, the field is read-only from the point of creation.
- Approved & Sent – This field is read-only and remains blank until the Purchase Order has been sent. Once sent, it displays the Standard Admin user who sent the Purchase Order, along with the Date and Time it was sent.
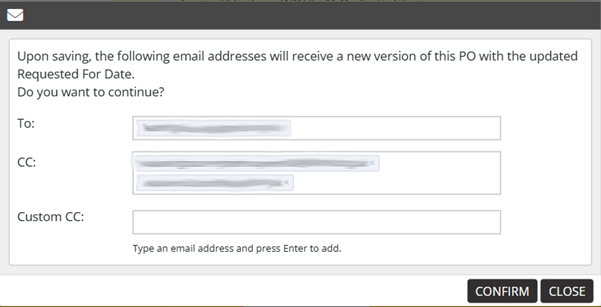
- Requested For – This is an editable date selector where the user can choose any date. The field remains editable even after the Purchase Order has been sent. The date entered at the time of sending becomes the Originally Requested For Date, but the field can still be updated if needed. If the date is changed after the Purchase Order has been sent, the system displays an email popup. The user can select recipients for the updated email, which by default includes the Supplier, System Buyer, and Project Surveyor, and can also add custom CCs if necessary.
- Delivered – When this checkbox is selected, the system displays a prompt asking if the user wants to mark all items as fully delivered. Selecting Yes sets the Delivered Quantity for all Materials to the maximum and displays a date next to the Delivered checkbox, indicating when the items were marked as delivered.
- Actual Delivered Date – This is an editable date selector that allows the user to choose any date. The field remains editable even after the Purchase Order has been sent. The Actual Delivered Date is used in system calculations, including the Dashboard Materials figure and Dashboard Actual Deliveries.
- Order To Office – When this checkbox is selected, the system populates the Address and Postcode fields with the Company Details Address from the Settings Details page. This checkbox can only be used before the Purchase Order is sent; once sent, it cannot be selected or deselected.
- Hold Paying Invoice – When this checkbox is selected, it marks the Purchase Order as held. The order will then appear when the Purchasing table is filtered by the Held status. On the list page, the Hold Invoice checkbox will also be selected for these Purchase Orders, and they will appear in the Remove Holds popup. This checkbox can be selected or deselected at any time.
- Hide Costs – When this checkbox is selected and the Purchase Order is sent; the outgoing Purchase Order Email will exclude all Costs. This checkbox cannot be selected or deselected after the Purchase Order has been sent.
- Total Cost – This figure represents the Total Cost of all of the Materials that are being ordered in the Purchase Order.
- Internal Notes – The Internal Note field is editable both before and after the Purchase Order is sent, allowing the user to enter any necessary notes for the order. If the Purchase Order was created through the Operative Portal by an Operative or Contract Manager, this field may be pre-populated with notes entered at the time of creation.
- External Notes – The External Notes field is editable only before the Purchase Order has been sent. Notes entered here can only be added from the Admin Site and will be included in the Purchase Order Email that is sent out.
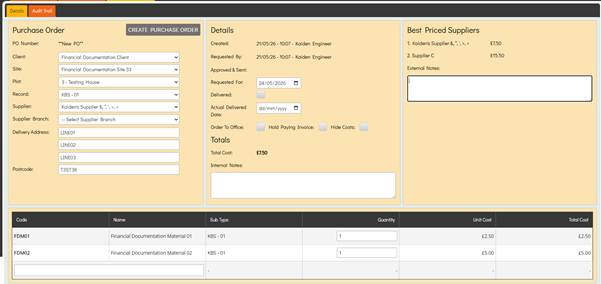
- Best Priced Suppliers – The Best Priced Suppliers section lists the Client’s Suppliers that have an assigned Cost for the Materials in the Purchase Order. Suppliers are displayed from cheapest at the top to most expensive at the bottom, providing a comparison of Costs for the best priced Suppliers.
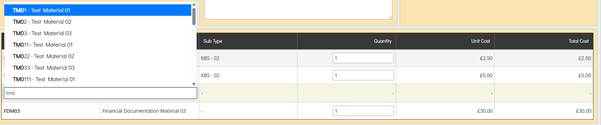
Users can alter Material Quantity by changing the value in the Quantity field for each Material.
The Materials table within the Purchase Order Details page contains multiple columns which provide key information for each Material, as described below:
- Code – Displays the Code for each Material, as defined when the Material is added to the system through the System Materials area or via a Price Import.
- Name – Displays the Name for each Material, as defined when the Material is added to the system through the System Materialsarea or via a Price Import.
- Sub Type – Displays the Sub Type for each Material, this is the Plot Sub Type that the Material has been added to within the Site.
- Previously Ordered Quantity – The Previously Ordered Quantity represents the total cumulative Quantity that has been ordered and sent for that Material against the specific Sub Type.
- Quantity – This is an editable field where the user can enter a numeric value representing the Quantity of the Material to be ordered in the Purchase Order. The value cannot exceed the maximum available Quantity remaining for the Material. This field becomes locked once the Purchase Order has been sent.
- Delivered Quantity – When a Purchase Order is sent, the Previously Ordered Quantity column is replaced by the Delivered Quantity column. This is an editable field where the user can enter a numeric value up to the ordered Quantity. If only part of the Quantity is marked as delivered, the Purchase Order is assigned a Partially Delivered status. If the full ordered Quantity is marked as delivered for all Materials, the Purchase Order is assigned a Delivered status. When the maximum Quantity is entered in the Delivered Quantity field for all Materials, the system will automatically select the Delivered checkbox.
- Unit Cost – This value represents the Cost per unit of the Material for the selected Supplier.
- Total Cost – This value represents the Total Cost of the Material being ordered in the Purchase Order, calculated by multiplying the Unit Cost by the Quantity.
If necessary, the user can manually add Materials to a Purchase Order even if the Materials do not exist on the selected record. This is done by entering Edit mode and using the search bar within the Materials table to enter the Material Name or Code. The system returns relevant results once three or more characters have been entered.
When a Material is selected, it is added to the Materials table, allowing the user to enter the required Quantity. If a Material is manually added, it is highlighted in green once the record is saved to indicate that it has been added manually.

Sending Purchase Orders
To send a Purchase Order, the user can enter Edit mode and select the Create Purchase Order button in the top left.
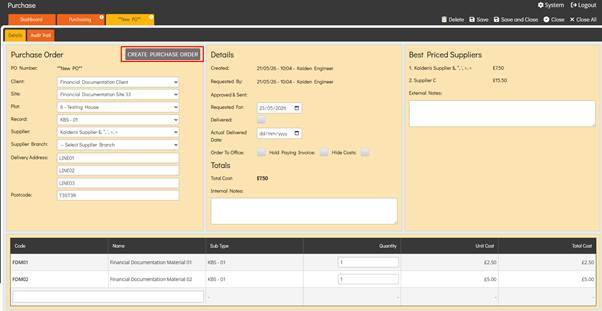
The system will display the Send To Supplier popup, which includes the Supplier Email, System Buyer Email, and Project Surveyor Email. Users can also add Custom CCs. Selecting Send in the popup creates the Purchase Order, sends the Purchase Order Email, and assigns a PO Number.

If no Material Quantity is entered or a Requested For date is missing, the system will display an error and inform the user of the issue when they attempt to send the Purchase Order.
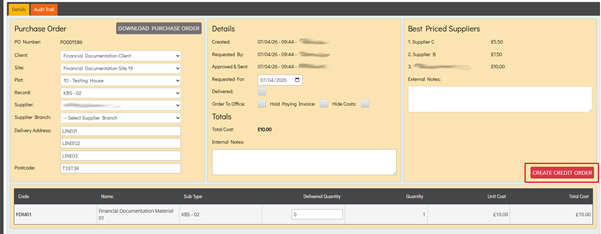
Once a Purchase Order has been sent, entering Edit mode displays an additional red Create Credit Order button. Selecting this button creates a Credit Order.
For sent Purchase Orders, the Requested For date is added to the Deliveries calendar.
For sent Purchase Orders, the Details page includes an additional Download Purchase Order button. When the user selects this, the system downloads a PDF of the Purchase Order, which is the same document attached to the Purchase Order Email.
The Material Quantity ordered and sent in Purchase Orders is deducted from the Remaining Available Quantity for that Material on the Build Stage or Variation.
Deleting Purchase Orders
To Delete a Purchase Order, the user can enter Edit mode on the Purchase Order Details page and select the Delete button in the top-right corner. The system will display a confirmation popup asking the user to confirm the deletion. If Yes is selected, the Purchase Order will be deleted.
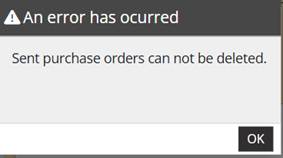
Users cannot delete Purchase Orders that have already been sent. If a deletion is attempted on a sent Purchase Order, the system prevents it and displays an error popup stating, Sent purchase orders cannot be deleted.
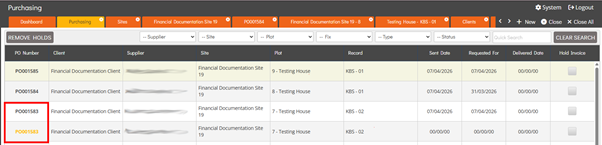
Deleted Purchase Orders appear highlighted in red in the Purchasing table, making them easy to identify.
Only users with the Super User switch enabled can view deleted Purchase Order records.
Super Users can Restore a deleted Purchase Order by opening the record and selecting the Restore button in the top-right corner. Once restored, the Purchase Order returns to its default colour in the Purchasing table.
Purchase, Credit & Pre-Order Email
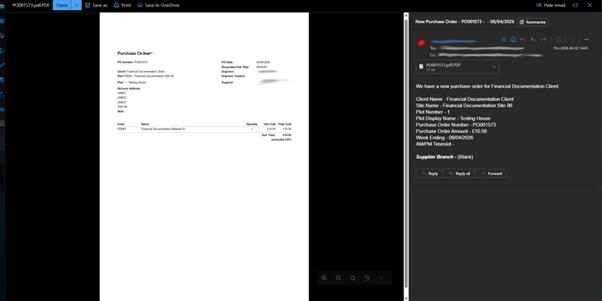
When a Purchase Order is sent, the system emails the Purchase Order Created template from the Email Templates area, along with a PDF attachment of the Purchase Order, to the recipients specified in the Send To Supplier popup.

If the Requested For date is updated after the Purchase Order has been sent, the Send To Supplier popup is displayed again, forcing the email to be re-sent with the updated date to the selected recipients.
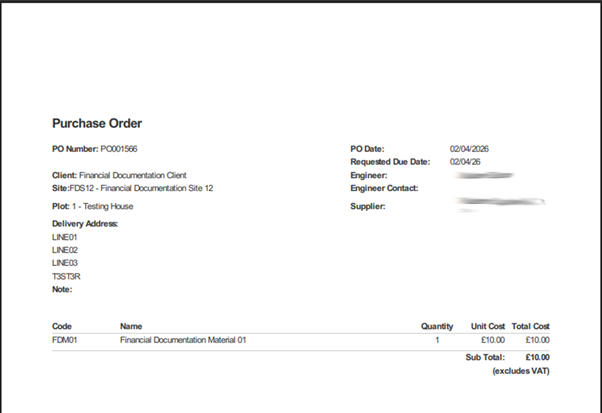
The PDF attachment in the email contains key information for the Purchase Order, as described below:
- PO Number – Displays the PO Number generated for the specific order, which is created when the Purchase Order is sent.
- Client – Displays the Client associated with the Purchase Order. This value is derived from the selection made in the Client dropdown on the Purchase Order Details page.
- Site – Displays the Site associated with the Purchase Order. This value is derived from the selection made in the Site dropdown on the Purchase Order Details page.
- Plot – Displays the Plot associated with the Purchase Order. This value is derived from the selection made in the Record dropdown on the Purchase Order Details page.
- Delivery Address – Displays the Delivery Address associated with the Purchase Order. This is derived from the Delivery Address & Postcode fields in the Purchase Order Details page.
- Note – Displays the Note made for the Purchase Order, which is derived from the External Notes field in the Purchase Order Details page.
- PO Date – Displays the date that the Purchase Order was created.
- Requested Due Date – Displays the Requested Due Date for the Purchase Order. This date is derived from the Requested For field on the Purchase Order Details page. If the Requested For date is changed after the Purchase Order has been sent, the email triggered by the update will include the revised date.
- Engineer – Displays the user who Requested the Purchase Order, which is derived from the Requested By section in the Purchase Order Details page.
- Engineer Contact – Displays the Mobile Number of the Requested By user, as listed on their User Details page.
- Supplier – Displays the Supplier associated with the Purchase Order, which is derived from the Supplier dropdown in the Purchase Order Details page.
- Code – Displays the Code for each Material included in the Purchase Order. The code is defined when the Material is added to the system through the System Materials area or via a Price Import.
- Name – Displays the Name for each Material included in the Purchase Order. The Name is defined when the Material is added to the system through the System Materials area or via a Price Import.
- Quantity – Displays the Quantity for each Material included in the Purchase Order. The Quantity for each Material is defined in the Purchase Order Details page before the order is sent.
- Unit Cost – This value represents the Cost per unit of the Material for the selected Supplier.
- Total Cost – This value represents the Total Cost of the Material being ordered in the Purchase Order, calculated by multiplying the Unit Cost by the Quantity.
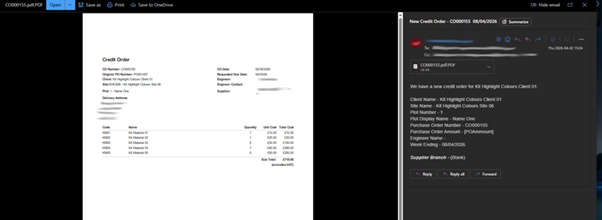
When a Credit Order is sent, the system automatically sends the Credit Order Created Email Template along with a PDF of the Credit Order. This email is sent to the recipients specified in the Send To Supplier popup at the time the Credit Order is sent.

If the Requested For date is updated after the Credit Order has been sent, the Send To Supplier popup is displayed again, forcing the email to be re-sent with the updated date to the selected recipients.
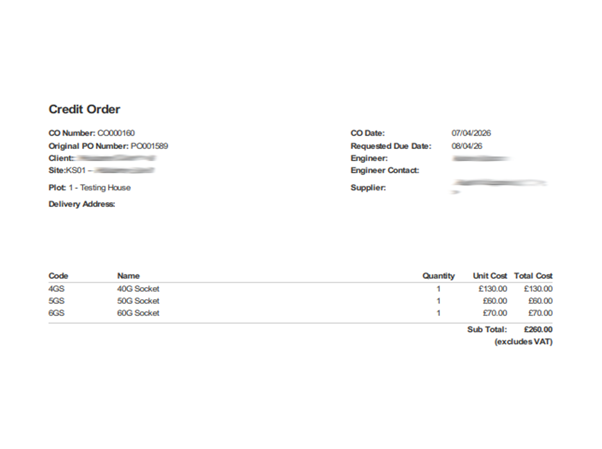
The PDF attachment in the email contains key information for the Credit Order, as described below:
- CO Number – Displays the CO Number generated for the specific order, which is created when the Credit Order is sent.
- Client – Displays the Client associated with the Credit Order. This value is derived from the selection made in the Client dropdown on the Credit Order Details page.
- Site – Displays the Site associated with the Credit Order. This value is derived from the selection made in the Site dropdown on the Credit Order Details page.
- Plot – Displays the Plot associated with the Credit Order. This value is derived from the selection made in the Record dropdown on the Credit Order Details page.
- Delivery Address – Displays the Delivery Address associated with the Credit Order. This is derived from the Delivery Address & Postcode fields in the Credit Order Details page.
- CO Date – Displays the date that the Credit Order was created.
- Requested Due Date – Displays the Requested Due Date for the Credit Order. This date is derived from the Requested For field on the Credit Order Details page. If the Requested For date is changed after the Credit Order has been sent, the email triggered by the update will include the revised date.
- Engineer – Displays the user who Requested the Credit Order, which is derived from the Requested By section in the Credit Order Details page.
- Engineer Contact – Displays the Mobile Number of the Requested By user, as listed on their User Details page.
- Supplier – Displays the Supplier associated with the Credit Order, which is derived from the Supplier dropdown in the Credit Order Details page.
- Code – Displays the Code for each Material included in the Credit Order. The code is defined when the Material is added to the system through the System Materials area or via a Price Import.
- Name – Displays the Name for each Material included in the Credit Order. The Name is defined when the Material is added to the system through the System Materials area or via a Price Import.
- Quantity – Displays the Quantity for each Material included in the Credit Order. The Quantity for each Material is defined in the Credit Order Details page before the order is sent.
- Unit Cost – This value represents the Cost per unit of the Material for the selected Supplier.
- Total Cost – This value represents the Total Cost of the Material being ordered in the Purchase Order, calculated by multiplying the Unit Cost by the Quantity.
When a Pre-Order is created via Sites Pre-Order or Purchasing Linked Build Stages, the system sends a Pre-Order email using the Purchase Order Created template from Email Templates, including a PDF attachment of the Pre-Order.
The email is sent to the selected Supplier for the Pre-Order along with the user who created the Pre-Order.
The Pre-Order PDF clearly indicates its status with **Preorder – DO NOT SEND MATERIALS** displayed in bold red text at the top of the document. Directly beneath this, a second line appears in smaller red text stating, A Purchase Order follow up will confirm this order.
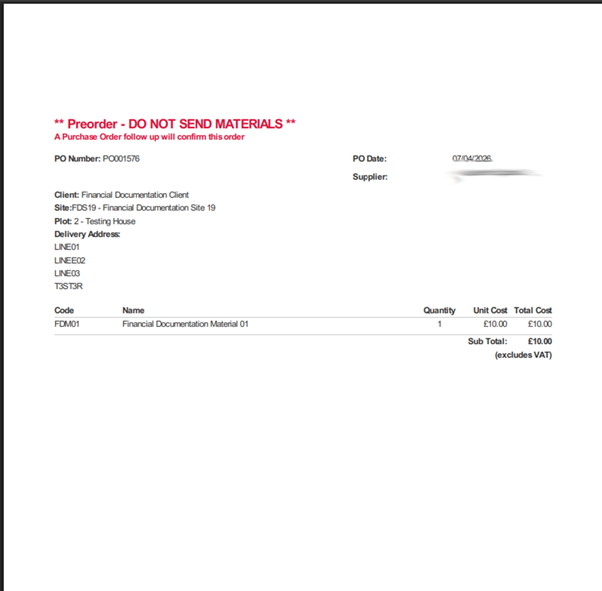
The PDF attachment in the email contains key information for the Pre-Order, as described below:
- PO Number – Displays the PO Number for the Pre-Order. This number is generated automatically when the Pre-Order is created.
- Client – Displays the Client associated with the Pre-Order.
- Site – Displays the Site associated with the Pre-Order.
- Plot – Displays the Plot associated with the Pre-Order.
- Delivery Address – Displays the Delivery Address associated with the Pre-Order. By default, when a Pre-Order is created, this is set to the associated Site’s Address.
- PO Date – This date represents the date the Pre-Order was created.
- Supplier – Displays the Supplier associated with the Pre-Order, as selected from the Supplier dropdown upon Pre-Order creation. Once the Pre-Order has been created, the Supplier dropdown becomes read-only.
- Code – Displays the Code for each Material included in the Pre-Order. The code is defined when the Material is added to the system through the System Materials area or via a Price Import.
- Name – Displays the Name for each Material included in the Pre-Order. The Name is defined when the Material is added to the system through the System Materials area or via a Price Import.
- Quantity – Displays the Quantity for each Material included in the Pre-Order. By default, the Quantity is a read-only value for Pre-Orders and the system sets this to the maximum available Quantity at the time of Pre-Order creation.
- Unit Cost – This value represents the Cost per unit of the Material for the selected Supplier.
- Total Cost – This value represents the Total Cost of the Material being ordered in the Purchase Order, calculated by multiplying the Unit Cost by the Quantity.
Material Highlight Colours
The rows for Materials within Purchase Orders and Credit Orders may be highlighted in red, amber, or green to indicate specific Material amendments, as described below.
Purchase Orders:
The row for a Material is highlighted in green to indicate that it was added to the selected Build Stage after the Purchase was created. This provides clear visibility of Materials added post–Purchase Order creation and helps users identify which Materials have not been included in the Purchase Order.
Rows highlighted in green display a Quantity of 0. This indicates that the Material has not been included in the Purchase Order and therefore does not affect the overall Cost. Materials highlighted in green will not be included in the Purchase or Credit Order Email.

The row for a Material is highlighted in amber to indicate that the Quantity has been modified from the full amount. If a user updates the Material Quantity in the Purchase Order to any value other than the full Quantity, the row will be highlighted in amber upon saving.

The row for a Material is highlighted in red to indicate that it has been removed from the selected Build Stage after the Purchase Order was created. This provides clear visibility of Materials removed following order creation.
If a Material row is highlighted in red, its Costs remain included in the Purchase Order and it will still be present in the Purchase or Credit Order Email, as it was still part of the order at the time of creation. However, once highlighted in red, the Quantity becomes read-only.

All highlighted rows remain highlighted even after the Purchase Order has been sent, ensuring full visibility at every stage of the order.
Credit Orders:
Credit Orders do not include Materials highlighted in green, as they only display Materials that were ordered in the related Purchase Order.

Within a Credit Order, a Material row is highlighted in amber when its Quantity is changed from the original Purchase Order it was created from.

The row for a Material is highlighted in red to indicate that it has been removed from the selected Build Stage after the Purchase Order was created. This provides clear visibility of Materials removed following order creation.
If a Material row is highlighted in red, its Costs remain included in the Credit Order and it will still be present in the Purchase or Credit Order Email, as it was still part of the order at the time of creation.

Marking Materials Delivered
The system allows a Purchase or Credit Order to be marked as Partially Delivered or Delivered. The Materials table displays the Delivered Quantity for each ordered Material, providing full visibility of what has and has not been delivered.
To mark a Purchase or Credit Order as Delivered, the user can enter Edit mode on the Details page and select the Delivered checkbox. The system will prompt the user to confirm marking all items as fully delivered. If Yes is selected, the system records the delivery date next to the Delivered checkbox. Once selected, the Delivered checkbox cannot be unchecked.
If the maximum ordered Quantity is entered in the Delivered Quantity field for all Materials in the Purchase or Credit Order, the system will automatically select the Delivered checkbox and record the delivery date next to it.
To mark a Purchase or Credit Order as Partially Delivered, the user can enter Edit mode and input the Delivered Quantity for the relevant Materials. The order will be marked as Partially Delivered until every Material has a full Delivered Quantity.
When a Purchase or Credit Order is marked as fully delivered, the delivery date is also recorded in the Delivered Date column of the Purchasing table.
Linked Build Stages
The Linked Build Stages popup allows users to Pre-Order any Build Stages linked to the one being ordered. These links are established through the Linked Build Stages multi-select within the System Build Stages area.
When the user sends a Purchase Order, if the Build Stage being ordered has Linked Build Stages that have not yet been Pre-Ordered, the system displays the Linked Build Stages popup, showing a row for each linked Build Stage.
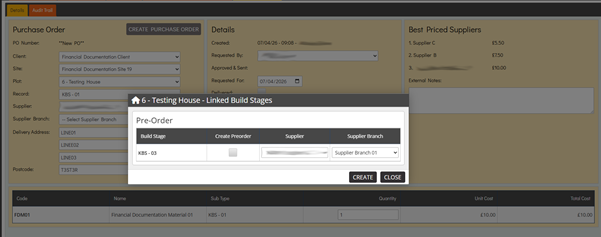
The Linked Build Stages popup contains four columns that display key information for each Build Stage and allow the user to edit details and create the Pre-Order, as follows:
The Build Stage column lists each Build Stage that is linked to the one that is being ordered from but has not yet been pre-ordered.
The Create Preorder column displays a checkbox for each Build Stage listed in the popup. Users can select or deselect this checkbox, and its status determines which Build Stages will have a Pre-Order created against them.
The Supplier column contains a dropdown for each row, initially pre-populated with the Lead Supplier selected for the Build Stage, which is derived from the Build Stage Details page. This dropdown is editable and lists all of the associated Clients Suppliers with an assigned Cost for the Materials included in the Pre-Order. The selected Supplier determines the Material Cost for each Material when the Pre-Order is created.
The Supplier Branch column contains a dropdown for each row, initially pre-populated with the Supplier Branch selected for the Build Stage, which is derived from the Build Stage Details page. This editable dropdown lists all Supplier Branches associated with the selected Supplier, as defined in the Supplier Branches area. The branch chosen determines which branch is applied in the Pre-Order. Selecting a Supplier Branch is optional, so the dropdown may be left blank.
After selecting the Create Preorder checkbox for the desired Build Stages, the user can click the Create button to generate Pre-Orders for the selected Build Stage(s). The created Pre-Orders appear in the Purchasing table with an amber PO Number.
Pre-Orders can also be created through the Site’s Pre-Order area or by an Operative or Contract Manager via the Operative Portal.
When a Purchase Order is created for the same Site, Plot, and Build Stage as the Pre-Order, it uses the same PO Number, but it is displayed in black instead of amber.
Creating a Credit Order
The system allows users to create a Credit Order, which functions as a refund for Materials.
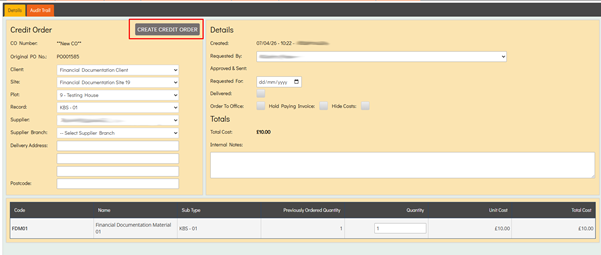
When a user enters Edit mode in a sent Purchase Order, a red button labelled CREATE CREDIT ORDER appears. Selecting this button prompts a confirmation popup; if Yes is chosen, the Credit Order is created for the Purchase Order, and the system navigates the user to the Credit Order Details page.
Credit Order Details
The Credit Order Details page contains multiple dropdowns, fields, and checkboxes that provide a range of functionality for the Purchase Order, as described below:
- CO Number – When a Credit Order is created, its CO Number initially displays **New CO**. This is because a CO Number is not assigned until the Credit Order has been sent, at which point the system automatically generates a number.
- Original PO NO – Displays the Purchase Order Number of the Purchase Order from which the Credit Order was created.
- Client – This read-only dropdown displays the Client associated with the Credit Order, which is the same Client linked to the Purchase Order from which it was created.
- Site – This read-only dropdown displays the Site associated with the Credit Order, which is the same Site linked to the Purchase Order from which it was created.
- Plot – This read-only dropdown displays the Plot associated with the Credit Order, which is the same Plot linked to the Purchase Order from which it was created.
- Record – This read-only dropdown displays the Build Stage or Variation associated with the Credit Order, matching the Build Stage or Variation from the Purchase Order it was created from.
- Supplier – This read-only dropdown displays the Supplier associated with the Credit Order, matching the Supplier from the Purchase Order it was created from.
- Supplier Branch – This read-only dropdown displays the Supplier Branch associated with the Credit Order, matching the Supplier Branch from the Purchase Order it was created from. However, a Supplier Branch is optional so this dropdown may be blank.
- Delivery Address – Initially, the Delivery Address fields in a Credit Order are blank, allowing the user to enter the Address where the Materials should be returned.
- Postcode – Initially, the Postcode field in a Credit Order is blank, allowing the user to enter the Postcode where the Materials should be returned.
- Created – Displays the date and time the Credit Order was created, along with the user who created it.
- Requested By – Before the Credit Order is sent, this editable dropdown lists all non-deleted users in the system. The user can select who requested the Credit Order, with the default set to the user who created it. Once the Credit Order is sent, the dropdown becomes read-only and displays the Requested By user along with the date and time the Credit Order was created.
- Approved & Sent – Before the Credit Order is sent, this is blank. Once sent, it displays the date and time of sending along with the user who sent it.
- Requested For – This is an editable date selector where the user can choose any date. The field remains editable even after the Credit Order has been sent. The date entered at the time of sending becomes the Originally Requested For Date, but the field can still be updated if needed. If the date is changed after the Credit Order has been sent, the system displays an email popup. The user can select recipients for the updated email, which by default includes the Supplier, System Buyer, and Project Surveyor, and can also add custom CCs if necessary.
- Delivered – When this checkbox is selected, the system displays a prompt asking if the user wants to mark all items as fully delivered. Selecting Yes sets the Delivered Quantity for all Materials to the maximum and displays a date next to the Delivered checkbox, indicating when the items were marked as delivered.
- Order To Office – When this checkbox is selected, the system populates the Address and Postcode fields with the Company Details Address from the Settings Details page. This checkbox can only be used before the Credit Order is sent; once sent, it cannot be selected or deselected.
- Hold Paying Invoice – When this checkbox is selected, it marks the Credit Order as held. The order will then appear when the Purchasing table is filtered by the Held status. On the list page, the Hold Invoice checkbox will also be selected for these Credit Orders, and they will appear in the Remove Holds popup. This checkbox can be selected or deselected at any time.
- Hide Costs – When this checkbox is selected and the Credit Order is sent; the outgoing Credit Order Email will exclude all Costs. This checkbox cannot be selected or deselected after the Credit Order has been sent.
- Total Cost – This figure represents the Total Cost of all of the Materials that are being ordered in the Credit Order.
- Internal Notes – The Internal Note field is editable both before and after the Credit Order is sent, allowing the user to enter any necessary notes for the order.
The Materials table within the Credit Order Details page contains multiple columns which provide key information for each Material, as described below:
- Code – Displays the Code for each Material, as defined when the Material is added to the system through the System Materials area or via a Price Import.
- Name – Displays the Name for each Material, as defined when the Material is added to the system through the System Materials area or via a Price Import.
- Sub Type – Displays the Sub Type for each Material, this is the Plot Sub Type that the Material has been added to within the Site.
- Quantity – This is an editable field where the user can enter a numeric value representing the Quantity of the Material to be ordered in the Credit Order. The value cannot exceed the maximum available Quantity remaining for the Material. This field becomes locked once the Credit Order has been sent.
- Unit Cost – This value represents the Cost per unit of the Material for the selected Supplier.
- Total Cost – This value represents the Total Cost of the Material being ordered in the Credit Order, calculated by multiplying the Unit Cost by the Quantity.
Sending Credit Orders
To send a Credit Order, the user can enter Edit mode and select the Create Credit Order button in the top left.
The system will display the Send To Supplier popup, which includes the Supplier Email, System Buyer Email, and Project Surveyor Email. Users can also add Custom CCs. Selecting Send in the popup creates the Credit Order, sends the Credit Order Email, and assigns a CO Number.
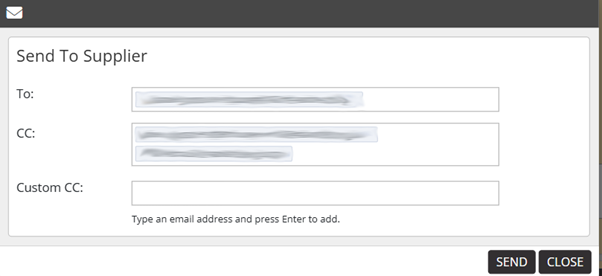
If no Material Quantity is entered or a Requested For date is missing, the system will display an error and inform the user of the issue when they attempt to send the Credit Order.
For sent Credit Orders, the Requested For date is added to the Deliveries calendar.
For sent Credit Orders, the Details page includes an additional Download Credit Order button. When the user selects this, the system downloads a PDF of the Credit Order, which is the same document attached to the Credit Order Email.
The Material Quantity ordered and sent in Credit Orders is added back to the Remaining Available Quantity for that Material on the Build Stage or Variation.
Deleting a Credit Order
To Delete a Credit Order, the user can enter Edit mode on the Credit Order Details page and select the Delete button in the top-right corner. The system will display a confirmation popup asking the user to confirm the deletion. If Yes is selected, the Credit Order will be deleted.
Users cannot delete Credit Orders that have already been sent. If a deletion is attempted on a sent Credit Order, the system prevents it and displays an error popup stating, Sent purchase orders cannot be deleted.

Deleted Credit Orders appear highlighted in red in the Purchasing table, making them easy to identify.
Only users with the Super User switch enabled can view deleted Credit Order records.
Super Users can Restore a deleted Credit Order by opening the record and selecting the Restore button in the top-right corner. Once restored, the Credit Order returns to its default colour in the Purchasing table.