The Work Submissions area provides functionality that allows Operatives to view, create, edit, and delete Work Submissions that they have created.
Creating a New Work Submissions
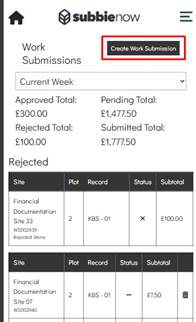
To create a new Work Submission within the Operative Portal, the user must navigate to the Work Submissions area and select the Create Work Submission button located in the top-right corner of the page.
The Operative Portal will then navigate the user to a new Work Submission record, where they can begin the Site, Plot, and Record Selection Process.
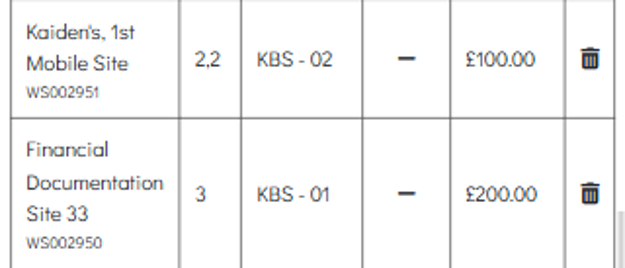
Once a Work Submission has been created it will be placed in the Work Submissions table, which contains six columns which each display key information for each Work Submission.
The Work Submissions table consists of six columns: Site, Plot, Record, Status, Subtotal and Delete. Each of these columns is described below.
- Site – Displays the Site associated with the Work Submission, which is selected when the Work Submission is created. Below the Site name, the table also displays the Work Submission Number that was generated when the Work Submission was created.
- Plot – Displays the Plot associated with the Work Submission, which is selected when the Work Submission is created.
- Record – Displays the Record associated with the Work Submission, which is selected when the Work Submission is created. This can be either a Build Stage or a Variation.
- Status – There are a variety of Work Submission statuses, which may be represented by a tick, a question mark, or a dash, each of these are described below.
- ✓ – The tick means the Work Submission has been submitted and Accepted.
- ? – The question mark means the Work Submission has been submitted but has not yet been marked as Rejected or Accepted.
- − – The dash means the Work Submission is unsubmitted, meaning the Operative has not yet submitted it back to the admin site.
- Subtotal – Displays the Subtotal for the Work Submission, which represents the Cost of the Labour Items included within the Work Submission.
- Delete – The end column is the Delete column. This contains a recycle bin icon if the Work Submission has not been submitted. However, if the Work Submission has been submitted, this column instead displays a dash, indicating that the Work Submission can no longer be deleted from the Operative Portal.
Site,Plot and Record Selection Process
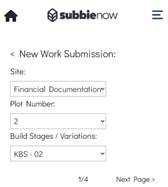
Once the user has selected Create Work Submission, the Operative Portal will navigate the user to a New Work Submission page where they can begin the Site, Plot, and Record selection process.
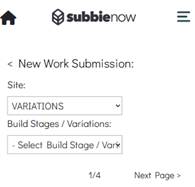
This page contains three dropdown fields: Site, Plot Number, and Build Stages / Variations.
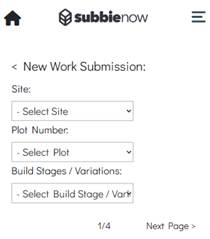
The Site dropdown lists all Sites currently assigned to the signed-in user. Once a Site has been selected, the Plot Number dropdown will be populated with the Plots associated with the selected Site.
An additional fixed option named VARIATIONS is also available within the Site dropdown. When this option is selected, the Plot Number dropdown is hidden, and the Build Stages / Variations dropdown is populated with all Variations across every Site assigned to the user. This allows users to quickly locate and create Work Submissions for Variations.
The Plot dropdown lists all available Plots for the selected Site, displayed by their Plot Numbers. Plots that are deleted, completed, or do not contain any associated Build Stages or Variations with remaining Labour Items to submit will not be displayed.
Once a Plot has been selected, the Build Stages / Variations dropdown will be populated with the Build Stages and Variations associated with that Plot.
The Build Stages / Variations dropdown lists the Build Stages and Variations associated with the selected Plot. Any records that are deleted or do not contain any remaining Labour Items available for submission will be hidden from the dropdown.
Once the user has finalised their selections, they can select the Next Page > button, which will navigate them to the second page where they can begin the Quantity Selection Process.
Quantity Selection Process
The Quantity Selection Process on the second page of a new Work Submission allows the user to enter the required quantity amounts for each available Labour Item associated with the selected Build Stage or Variation.
Once the user has advanced to the second page within the Operative Portal, the Labour Items available for submission for the selected Build Stage or Variation will be displayed in a table.
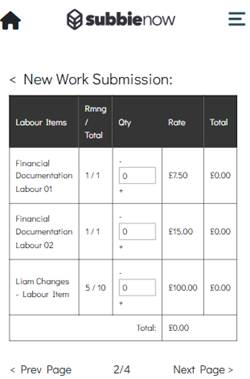
The table consists of five columns, each displaying key information relating to the Labour Items, as described below.
- Labour Items – Displays the Name of each Labour Item that is available for submission.
- Rmng / Total – Displays the Remaining Quantity available for submission for that Labour Item. This is calculated by deducting the Quantity already submitted (excluding any quantities from rejected submissions) from the Total Quantity available for the Labour Item. The total represents the full quantity of that Labour Item originally allocated to the selected Build Stage or Variation.
- Qty – This is an editable field that accepts numeric values up to the Remaining Quantity for that Labour Item. If the user enters a Quantity that exceeds the Remaining Quantity and attempts to proceed to the next page, the Operative Portal will prevent this action and display an error indicating that one or more Labour Items exceed the Remaining Quantity. When the value in this field is updated, the Total column is updated accordingly to reflect the change.
- Rate – Displays the Cost of the Labour Item per unit.
- Total – Displays the Total Cost of the Labour Item to be included in the submission. This is calculated by multiplying the unit Rate by the entered Quantity.
Once the user has finalised the quantities, they can select Next Page to proceed. This will navigate them to the third page, where they can begin the Form Completion Process.
Form Completion Process
The Form Completion Process on the Operative Portal contains the questions that an admin user has added to a Form and then associated with the Labour Item(s).
Therefore, the Forms attached to the Labour Item(s) selected in the Quantity Selection Process are displayed for the Operative to answer questions.
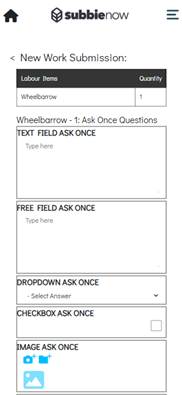
There are multiple question types that can exist within a Form, such as Text/Free Fields, Dropdowns, Checkboxes, Images, and Videos.
Each Form is labelled with a title above it, which represents the Labour Item name that the Form relates to, followed by the Form Name.
Each question type and its functionalities are described below, including how the Operative can interact with and provide responses for each field within the Form Completion Process.
- Text Field – The Text Field question type allows the Operative to enter a written response within a free text input field using the device keyboard.
- Free Field – The Free Field question type allows the Operative to manually enter additional information or comments within a free text input field using the device keyboard.
- Dropdown – The Dropdown question type allows the Operative to select a single response from a predefined list of available options.
- Checkbox – The Checkbox question type allows the Operative to confirm or acknowledge a statement or requirement by selecting the checkbox field.
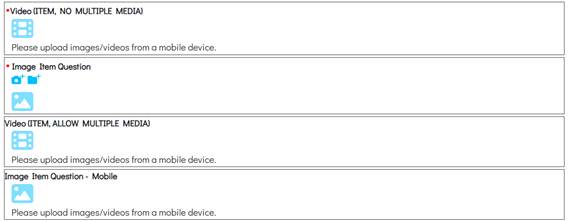
- Image – The Image question type allows the Operative to either take a photo using the camera or select an existing image from the device library. Taking a photo is performed by selecting the camera icon with a plus symbol, while selecting from the library is done by selecting the folder icon with a plus symbol.
- Video – The Video question type allows the Operative to select an existing video from the device library; this is done by selecting the folder icon with a plus symbol.
Some Image or Video questions may not allow the user to upload an Image or Video from a desktop machine, as certain questions require uploads via a mobile device. When Image and Video questions require a mobile device, desktop users will see the message “Please upload images/videos from a mobile device,” and the camera and folder upload icons will be hidden.
Questions that have a red dot to the left of them indicate that they are Required Questions. If the user does not complete these questions and attempts to move to the next page, the system will prevent this by displaying an error popup informing the user that not all required questions have been answered. The system also highlights the relevant questions in red so the user can easily identify which ones need to be completed.

Some Image and Video questions allow the user to upload multiple images and videos, while others only allow a single image or video upload. For single-upload questions, if an image or video already exists and the user uploads a new one, the existing file will be replaced.
Certain questions are only required to be asked once. Therefore, if there are multiple instances of the same Form due to the user submitting multiple of the same Labour Item, the Ask Once question will only be shown in the first instance of the Labour Item Form and will be excluded from all subsequent instances.
Some Forms may contain Item Questions, which are a grouped set of questions. If a Form contains an Item, one Item is added to the Form by default, listing all questions within that Item. Items have a predefined maximum limit, and the user can add additional instances by selecting the add item button. This button will disappear once the maximum limit is reached. Each time an Item is added, the Form displays an additional set of questions contained within that Item.
Once the user has finalised their answers for the questions, they can select the Next Page button to advance to the fourth and final page to determine the Payment Split Configuration.
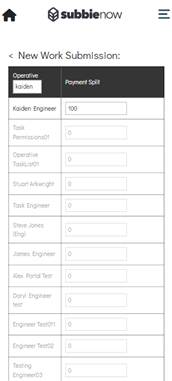
Payment Split Configuration
The Payment Split Configuration allows the Operative to determine how the payment is distributed for the Work Submission. This may be adjusted if more than one Operative worked on the job.
The Payment Split Configuration section contains a Quick Search feature which searches against the Operative column.
The Payment Split percentage must equal a combined value of 100. If the total does not equal 100 and the user attempts to submit the Work Submission, the system will prevent this by displaying an error informing the user that the Payment Split must add up to 100.
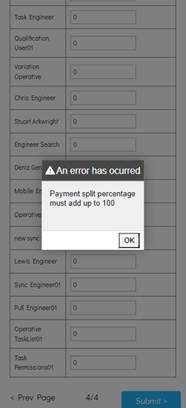
Each Operative has an editable field which accepts any numeric value. The user can split the payment as required and, once complete, can scroll to the bottom and select the Submit button to submit the Work Submission. Once a Work Submission has been submitted, its contents can no longer be altered unless the submission is rejected and requires resubmission.
Submitted Work Submissions
When viewing a submitted Work Submission within the Operative Portal, the user is unable to make any changes to the submitted Pending Work Submission.
The only occasion where a submitted Work Submission can be re-edited is if it has been Rejected and the Operative is required to resubmit it. In this scenario, the portal allows the Operative to alter their answers within the Form and resubmit the Work Submission.
The user is still able to view the answers from their Form Completion, as well as the Payment Split Configuration, but these are displayed as read-only within the Pending Work Submission.
Rejected Work Submissions
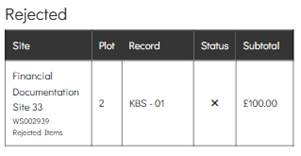
Within the Operative Portal, Rejected Work Submissions are displayed in a separate table from all other Work Submissions. This table is labelled with the header Rejected to clearly indicate its status category.
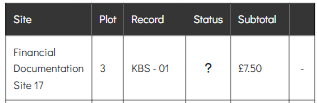
The Rejected Work Submissions table consists of five columns: Site, Plot, Record, Status, and Subtotal. Each of these columns is described below.
- Site – Displays the Site associated with the Work Submission, which is selected when the Work Submission is created. Below the Site name, the table also displays the Work Submission Number that was generated when the Work Submission was created. For Rejected Work Submissions, the Work Submission Number will additionally display “– Rejected Items” after the number, as all entries within this table have a Rejected status.
- Plot – Displays the Plot associated with the Work Submission, which is selected when the Work Submission is created.
- Record – Displays the Record associated with the Work Submission, which is selected when the Work Submission is created. This can be either a Build Stage or a Variation.
- Status – There are a variety of Work Submission statuses, which may be represented by an X, a tick, a question mark, or a dash. However, within the Rejected Work Submissions table, the status will always be displayed as an X, as this table only contains Work Submissions with a Rejected status.
- Subtotal – Displays the Subtotal for the Work Submission, which represents the Cost of the Labour Items included within the Work Submission.
Users can select a Rejected Work Submission from the list to open it. Within the Operative Portal, the Work Submission will display a Rejected status in red at the top of the page, with the Rejected Reason shown beneath it in red text.
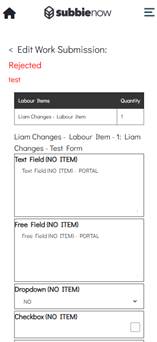
The user can then navigate through the associated Labour Item Form(s), make any required amendments, and resubmit the Work Submission.
Deleting a Work Submission
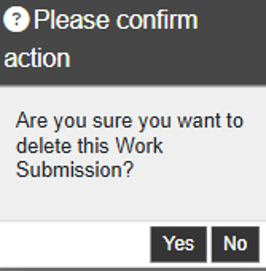
The Operative Portal permits the user to delete unsubmitted Work Submissions through the portal.
However, if the Work Submission has any status other than unsubmitted, deletion is not possible through the Operative Portal.
Unsubmitted Work Submissions that can be deleted contain a recycle bin icon within the far-right column. When selected, the portal displays a confirmation popup asking the user to confirm the deletion of the Work Submission. If Yes is selected, the Work Submission is permanently deleted and cannot be recovered.
Total Costs Derivation
The Work Submissions area lists the Total Costs for Approved, Pending, Rejected, and Submitted Work Submissions for a selected period, allowing the Operative to view their Work Submissions and track their current status.
Approved Total
The Operative Portal lists totals above the Work Submission table. The Approved Total represents the Cost of the Work Submissions submitted by the Operative that have been Accepted by an admin user.
The Work Submissions included within the Approved Total depend on the selected date range filter, such as Current Week, Previous Week, or Custom Range.

Pending Total
The Operative Portal lists totals above the Work Submission table. The Pending Total represents the Cost of the Work Submissions submitted by the Operative that have not yet been Accepted or Rejected by an admin user.
The Work Submissions included within the Pending Total depend on the selected date range filter, such as Current Week, Previous Week, or Custom Range.
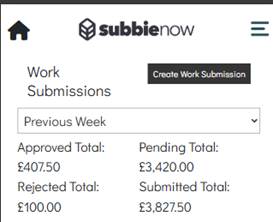
Rejected Total
The Operative Portal lists totals above the Work Submission table. The Rejected Total represents the Cost of the Work Submissions submitted by the Operative that have been Rejected by an admin user.
The Work Submissions included within the Rejected Total depend on the selected date range filter, such as Current Week, Previous Week, or Custom Range.

Submitted Total
The Operative Portal lists totals above the Work Submission table. The Submitted Total represents the Cost of the Work Submissions submitted by the Operative that are either Pending or Accepted, meaning it is the combined value of the Approved Total and Pending Total.
The Work Submissions included within the Submitted Total depend on the selected date range filter, such as Current Week, Previous Week, or Custom Range.

Work Submission Filters
A range of Work Submissions filters are available to help users narrow down their results. These include Current Week, Previous Week, and Custom Range.
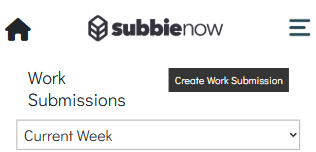
Current Week
The Current Week filter is applied by default when the user enters the Work Submissions area on the Operative Portal, as shown in the filter dropdown.
When the Current Week filter is applied, the Operative Portal displays all Work Submissions from the Operative that were created within the Current Week. Within the Operative Portal, the End Of Week Day is configured within the admin system, meaning this does not necessarily follow a standard calendar week, as the End Of Week Day may occur mid-week depending on the admin configuration.
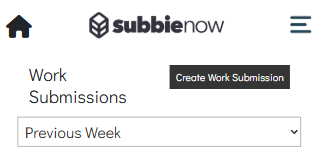
Previous Week
The user can apply the Previous Week filter within the Operative Portal by selecting the filter dropdown and choosing the Previous Week option.
Within the Operative Portal, the Previous Week range is determined using the configured End Of Week Day within the admin system, meaning the week does not necessarily follow a standard calendar week and may vary depending on the admin configuration.
Custom Range
The user can apply the Custom Range filter within the Operative Portal by selecting the filter dropdown and choosing the Custom Range option.
Below the filter dropdown, two date fields are displayed. By default, the From Date is set to the current date and the To Date is set to six days ahead.
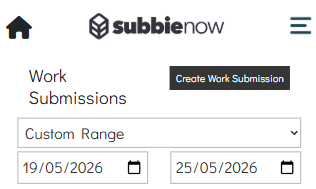
The Operative can alter these date fields by selecting the field and choosing the desired date.
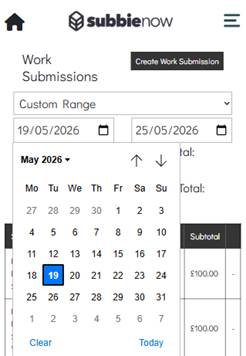
The displayed Work Submissions depend on their created dates and whether they fall within the specified date range.