Tasks
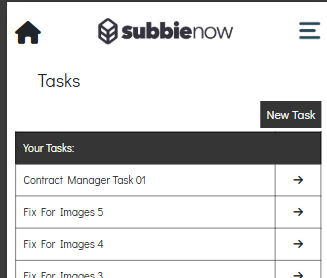
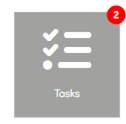
The Tasks area can be accessed by selecting the Tasks tile from the home screen or by selecting Tasks from the side menu. The Tasks area allows Contract Managers to view Tasks for Sites they are assigned to, regardless of whether they are assigned to the Task themselves. Contract Managers can also edit, and complete Tasks assigned to them, as well as create new Tasks.
Upon entering the Tasks area, the Contract Manager’s My Tasks list is displayed by default. An additional list named Site Tasks is also available.
My Tasks
The My Tasks tab provides a list of the Tasks that the Contract Manager is currently assigned to, and the Contract Manager can enter these Tasks and can Edit them and Complete them.
This list contains all active Tasks currently assigned to the Contract Manager, excluding any Tasks that have been deleted or completed. The Task List displays the name of each Task, and a Task can be opened by selecting it from the list.

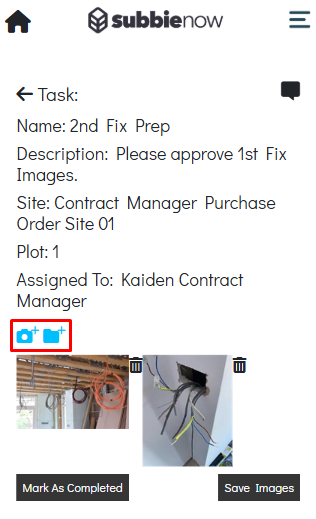
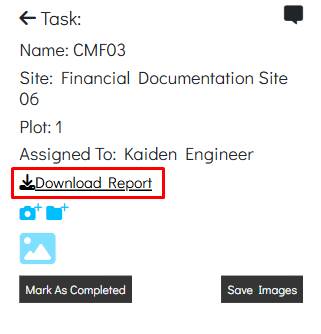
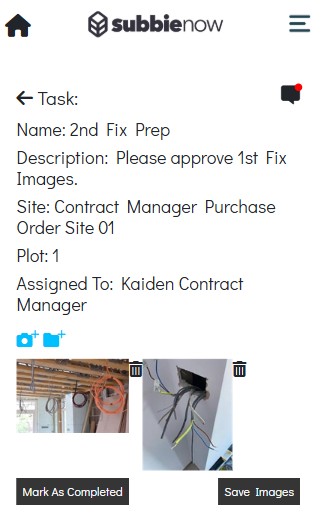
Once a Task has been selected from the table, it displays the information for the Task, such as the Name, Description, Assigned To, Site, Plot and the attached images, each section and where the information is derived from is described below.
- Name – Displays the name for the Task, which is populated from the Name field entered when the Task was created within the Operative Portal, Admin System, or Mobile Application.
- Description – Displays the Description for the Task, which is populated from the Description field entered when the Task was created within the Operative Portal, Admin System, or Mobile Application.
- Site – The Task List displays the Site assigned to the Task, which is derived from the Site dropdown configured within the Task. If no Site has been assigned to the Task, this information will not be displayed.
- Plot – The Task List displays the Plot assigned to the Task, which is derived from the Plot dropdown configured within the Task. If no Plot has been assigned to the Task, this information will not be displayed.
- Assigned To – Displays who the Task is Assigned To, which is derived from the User field configured within the Task. Once a Task has been created within the Operative Portal or Mobile Application, the assigned users cannot be edited from the Operative Portal. If changes to the assigned users are required, they must be completed within the Admin System.
- Images – The Images section displays any images attached to the Task, which may be added from the Operative Portal, Admin System, or Mobile Application. Users can select an image to expand it within a modal window, which contains both Close and Download options. The image modal can be closed either by selecting outside of the modal window or by selecting the Close button. Selecting the Download button will immediately download the image locally to the user’s device.
To upload an image to a Task, the user must first open the Task. Within the task, a camera icon with a plus symbol and a folder icon with a plus symbol will be displayed.
Selecting the camera icon will open the device camera, allowing the user to take one or more photographs. Any images captured will be automatically uploaded and attached to the Task immediately after being taken.
Selecting the folder icon will allow the user to upload existing images from their device library.
To delete an image, the user can select the bin icon displayed against the image. The system will then display a confirmation popup asking the user to confirm the deletion. If the user selects Yes, the image will be permanently removed from the Task and cannot be recovered.
Tasks themselves cannot be deleted from the Operative Portal. If a Task needs to be deleted, this must be completed by an administrator within the Admin System.
If the Task has been created from a Contract Manager Form submission within the Operative Portal or Mobile Application, an additional button labelled Download Report will be available within the Task. Selecting this button will download a report containing the completed Contract Manager Form along with the submitted responses.

To mark a Task as completed, the user must open the required Task and select the Mark As Completed button. Once selected, the Task will immediately be marked as completed.
Completed Tasks are not displayed within the Task List. After a Task has been marked as Completed, it will no longer appear in the Contract Managers My Task List.
Site Tasks
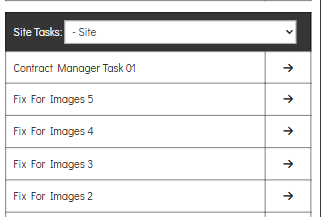
On the Operative Portal, the Site Tasks list is displayed in a separate table beneath the My Tasks list. The Site Tasks table displays all Active and Completed Tasks for the Sites that the Contract Manager is currently assigned to, regardless of whether they are assigned to the individual Task.
The Site Tasks section contains a Site dropdown filter listing all Sites that the Contract Manager is currently assigned to. When a Site is selected, the Site Tasks list is filtered to display only the Tasks assigned to the selected Site.
Once a Task has been selected from the table, it displays the information for the Task, such as the Name, Description, Assigned To, Site, Plot and the attached images, each section and where the information is derived from is described below.
- Name – Displays the name for the Task, which is populated from the Name field entered when the Task was created within the Operative Portal, Admin System, or Mobile Application.
- Description – Displays the Description for the Task, which is populated from the Description field entered when the Task was created within the Operative Portal, Admin System, or Mobile Application.
- Site – The Task List displays the Site assigned to the Task, which is derived from the Site dropdown configured within the Task. If no Site has been assigned to the Task, this information will not be displayed.
- Plot – The Task List displays the Plot assigned to the Task, which is derived from the Plot dropdown configured within the Task. If no Plot has been assigned to the Task, this information will not be displayed.
- Assigned To – Displays who the Task is Assigned To, which is derived from the User field configured within the Task. Once a Task has been created within the Operative Portal or Mobile Application, the assigned users cannot be edited from the Operative Portal. If changes to the assigned users are required, they must be completed within the Admin System.
- Images – The Images section displays any images attached to the Task, which may be added from the Operative Portal, Admin System, or Mobile Application. Users can select an image to expand it within a modal window, which contains both Close and Download options. The image modal can be closed either by selecting outside of the modal window or by selecting the Close button. Selecting the Download button will immediately download the image locally to the user’s device.
To upload an image to a Task, the user must first open the Task. Within the Task, a camera icon with a plus symbol and a folder icon with a plus symbol will be displayed.

Selecting the camera icon will open the device camera, allowing the user to take one or more photographs. Any images captured will be automatically uploaded and attached to the Task immediately after being taken.
Selecting the folder icon will allow the user to upload existing images from their device library.
To delete an image, the user can select the bin icon displayed against the image. The system will then display a confirmation popup asking the user to confirm the deletion. If the user selects Yes, the image will be permanently removed from the Task and cannot be recovered.
Tasks themselves cannot be deleted from the Operative Portal. If a Task needs to be deleted, this must be completed by an administrator within the Admin System.
If the Task has been created from a Contract Manager Form submission within the Operative Portal or Mobile Application, an additional button labelled Download Report will be available within the Task. Selecting this button will download a report containing the completed Contract Manager Form along with the submitted responses.
To mark a Task as completed, the user must open the required Task and select the Mark As Completed button. Once selected, the Task will immediately be marked as completed.
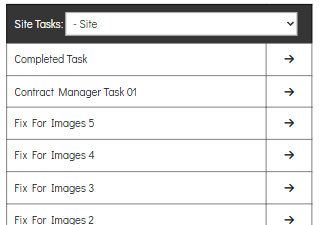
Completed Tasks are retained within the Site Task List. After a Task has been marked as Completed, it will remain in the Contract Managers Site Task List.
Creating a New Task
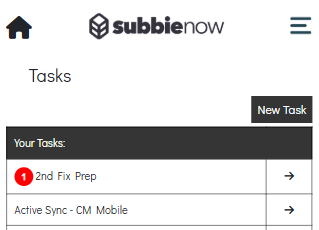
To create a Task within the Operative Portal, the Contract Manager must enter the Tasks area and select the New Task button located above the right-hand side of the table. The portal will then navigate the user to a new Task page where the Task details can be entered.
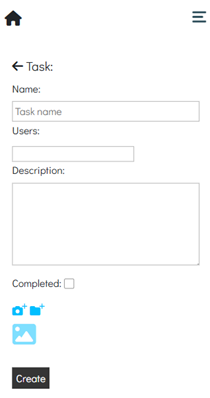
Each field within the new Task details page is described below.
- Name – The Name field is a free-text field that allows the Operative to enter the required Task name.
- Users – The Users multi-select field allows the user to assign one or more users to the Task, including Admin, Operative, Contract Manager, or Customer Care Engineer users. Once a user has been selected, an additional dropdown field named Site is displayed.
- Description – The Description field is a free-text field that allows the Operative to enter the required description for the Task.
- Site – The Site dropdown is only displayed once a user has been selected within the Users multi-select field. This dropdown lists all non-deleted Sites that the selected Users are currently assigned to, allowing the user to select the relevant Site for the Task. Once a Site has been selected, the Plot dropdown will then be displayed. The selection of a Site is not mandatory to create a Task.
- Plot – The Plot dropdown is only displayed once a Site has been selected. This dropdown lists all non-deleted Plots associated with the selected Site, allowing the user to select the relevant Plot for the Task. The selection of a Plot is not mandatory to create a Task.
- Completed – The status of the Completed checkbox determines whether the Task is created with a Completed status. If the checkbox is enabled, the Task will be created as Completed. If the checkbox is not enabled, the Task will be created as Active.
- Images – The Images section provides two upload options: a camera icon with a plus symbol and a folder icon with a plus symbol. Selecting the camera icon will open the user’s device camera, allowing the user to take a photo. Once the photo has been captured, it will be automatically added to the Task. Selecting the folder icon will open the user’s device library, allowing an existing image to be uploaded to the Task.
Once the user has entered the required Task details, they can select the Create button located at the bottom of the page to create the Task.
After the Task has been created, the Operative who created the Task will no longer be able to view it within their Task List, as they are not assigned to the Task by default.
Task Messenger
The Task Messenger on the Operative Portal provides functionality so the Contract Manager can chat back and forth with other Operatives, Contract Manager and Admin users on the Admin System.
When the user receives a Task message, the Tasks tile on the home screen will display a red notification indicator in the top-right corner of the tile. The notification indicator will contain a white number showing the total number of unread Task messages that require the user’s attention.
When the user enters the Tasks area, the Task List will display a red notification indicator to the left of any Task that contains unread messages. The notification indicator will contain a white number showing how many unread messages are associated with that specific Task.
When a Task is selected from the Task List, a chat bubble icon will be displayed within the Task. If there are no unread messages associated with the selected Task, the icon will be displayed without any notification indicator.
If the selected Task contains unread messages, the chat bubble icon will display a red notification indicator in the top-right corner, indicating that there are messages within the Task that have not yet been read.
When the chat bubble icon is selected, the Operative Portal will display the Task chat, showing all messages associated with that Task. Within the chat view, each message displays the date and time it was sent. A Last Read indicator line is also displayed to show the point up to which the user has previously read the conversation.
The Operative Portal displays a timestamp for when each message was sent. If the same user sends multiple messages within a five-minute window, those messages are grouped under a single timestamp.
To send a Task message, the user can enter text into the message field located at the bottom of the page and then select the Send icon. Alternatively, the user can press Shift + Enter on their keyboard to send the message. Pressing Enter on its own will create a new line within the message field, allowing the user to format their message as required.
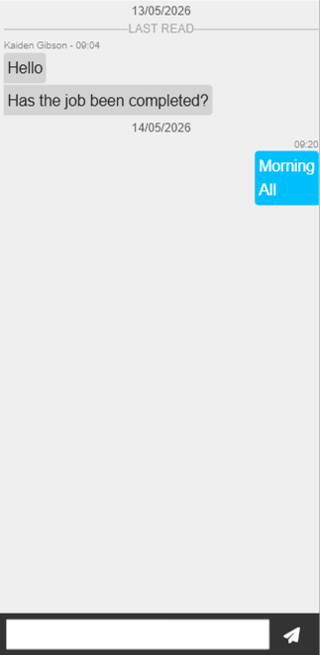
The Task chat can receive messages from other Operatives or Contract Managers who are assigned to the Task through either the Operative Portal or Mobile Application. Messages sent by other users will display the sender’s name above the message content to identify who sent the message.
The Task chat can also receive messages from users within the Admin System, regardless of whether those users are assigned to the Task or not.