Equipment
The Equipment area provides a calendar interface that enables users to view, manage, schedule, and delete events for Equipment. It also allows users to add new Equipment records directly into the system.
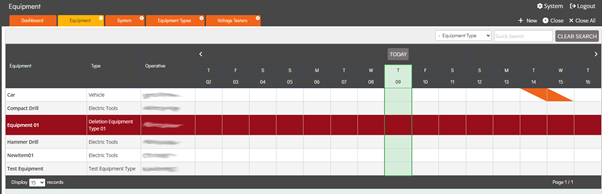
The Equipment column displays the name of the Equipment, as defined in the Name field on the Equipment Details page.
The Type column displays the Equipment Type, as selected in the Equipment Type dropdown on the Equipment Details page.
The Operative column displays the assigned Operative, as selected in the Assigned Operative dropdown on the Equipment Details page.
Users can view an existing Equipment record at any time by selecting the desired row within the Equipment, Type, or Operative columns. This action navigates the user to the Equipment Details page for the selected Equipment.
To delete an Equipment record, the user can select the desired Equipment from the table, enter Edit mode, and click the Delete button in the top-right corner. Deleted Equipment records are highlighted in red in the table to indicate their deleted status.
Only users with the Super User switch enabled in their User record can view deleted Equipment records. Super Users can Restore a deleted Equipment record at any time by selecting the record from the table and clicking the Restore button in the top-right corner.
Calendar Navigation & Filters
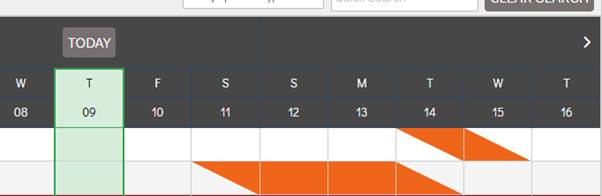
The calendar displays a two-week view, showing one week ahead and one week behind the current week.
Users can navigate through the calendar using the arrows in the header of the calendar table. Selecting the right arrow advances the calendar by two weeks, while selecting the left arrow displays the previous two weeks.
Clicking the Today button resets the calendar to the default view, centering on the current date and the surrounding weeks.
A Quick Search feature is available to target the Equipment column, making it easier to locate specific records quickly.
The Equipment Type dropdown filter displays all non-deleted types that have been configured in the Equipment Types area. When a type is selected from this dropdown, the calendar automatically updates to show only the Equipment rows associated with that type, providing a focused view of relevant equipment.
Creating New Equipment
To create a new Equipment record, the user can select the + New button located in the top-right corner. Upon selection, the system navigates the user to a new Equipment record, which opens automatically on the Equipment Details page.

Equipment Details
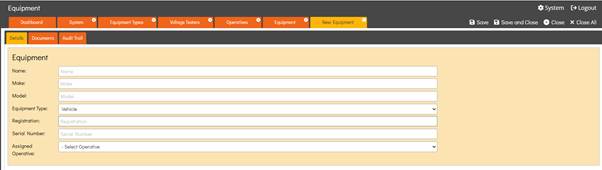
The Equipment Details page contains a range of fields and dropdowns used to capture key information about the Equipment being added.
The sections below describe each field and its purpose in detail.
- Name – This is a free-text field that allows the user to enter the desired Name of the Equipment.
- Make – This is a free-text field that allows the user to enter the Make of the Equipment.
- Model – This is a free-text field that allows the user to enter the model of the Equipment.
- Equipment Type – The Equipment Type dropdown displays all non-deleted Equipment Types that have been configured in the Equipment Types area. If an Equipment Type is selected that has the Reg Plate checkbox enabled in the Equipment Type Details page, an additional free-text field named Registration will be displayed.
- Serial Number – This is a free-text field that allows the user to enter the Serial Number for the Equipment.
- Assigned Operative – The Assigned Operative dropdown displays all non-deleted users with the Operative User Type in the system.
Equipment Documents
The Documents section allows users to View, Add, Edit, and Delete Documents associated with the selected Equipment.
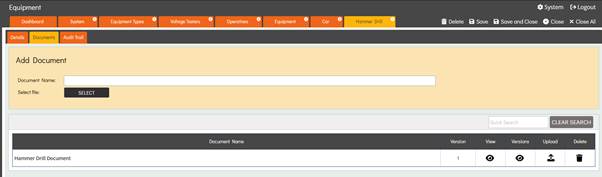
The Documents section contains a Quick Search which targets the Document Name column.
To add a new Document, the user must enter Edit mode and provide a name in the Document Name field. The user can then select the Select button, which opens the File Explorer and allows a file to be selected and uploaded.
Once a file has been chosen, the Document is added to the table using the name entered.
To upload a new version of a Document, the user must enter Edit mode and select the icon in the Upload column. This opens the File Explorer, allowing the user to choose a file. Once uploaded, the file becomes the most recent version of the Document and will be listed in the Versions popup.
To View an existing Document, the user can select the icon in the View column for the desired Document, which will open a new browser tab displaying the most recent version.
Alternatively, the user can select the icon in the Versions column to view a table containing all Versions of the Document. From this table, the user can select the icon in the View column to open a new browser tab displaying the selected version of the file.
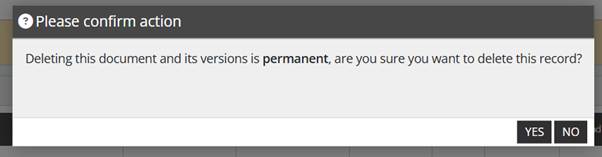
To Delete an existing Document, the user must enter Edit mode and select the icon in the Delete column. The system will display a confirmation dialog warning that deleting the document and all its versions is permanent. Once Yes is selected, the Document is deleted and cannot be recovered.
Deleted Documents are permanently removed from the Equipment’s Documents list and cannot be viewed or accessed in any way.
Scheduling Events
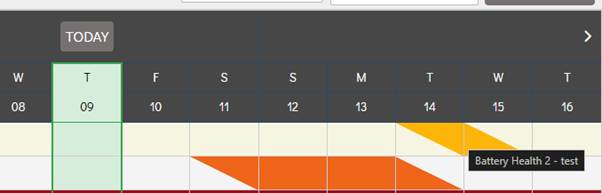
Scheduled events are displayed on the calendar as orange bars that visually span across the relevant dates. On the Start Date and End Date, the event bar covers half of the cell each—beginning with a half-filled cell on the Start Date and ending with a half-filled cell on the End Date. This visually indicates the precise start and finish boundaries of the event while the full cells in between are filled, creating a clear, continuous representation of the event’s duration.
When a Scheduled Event is hovered over it is highlighted in a light orange and a mouseover tooltip appears displaying the Event’s Name and Description.
Creating an Event
To schedule an event, the user can select a Start Date by clicking the cell for the relevant date and Equipment in the calendar. The system then displays the Schedule Event popup, which contains fields for Name, Description, and End Date.
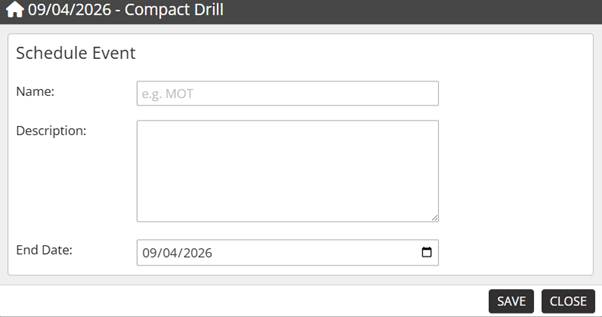
The Name field is a free-text field, allowing the user to enter any desired event Name. The Description field is also free-text, allowing the user to provide additional details about the event.
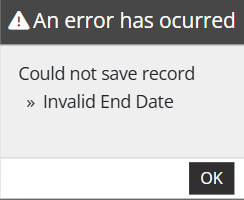
The End Date must be at least one day after the Start Date. If the user attempts to save an event with an invalid End Date, the system will prevent saving and display an error stating Invalid End Date.
Once an event is created, it appears on the calendar as orange bars spanning the relevant dates. The event bar covers half of the cell on both the Start Date and End Date, starting with a half-filled cell on the Start Date and ending with a half-filled cell on the End Date, clearly marking the event’s duration.
Existing Scheduled Events can be edited at any time by selecting the orange bar on the calendar. The system will then display the Schedule Event popup, pre-populated with the event’s current information. The user can amend the Name, Description, and End Date as needed.
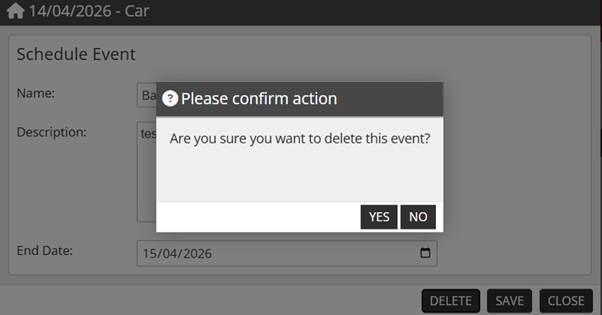
Deleting an Event
To delete an existing Scheduled Event, the user can select the desired event from the calendar. The system then displays the Schedule Event popup, pre-populated with the event’s current information.
This popup includes a Delete button. When the Delete button is selected, a confirmation popup appears asking the user to confirm the deletion. If Yes is selected, the event is permanently removed from the calendar. This deletion is final and cannot be undone.