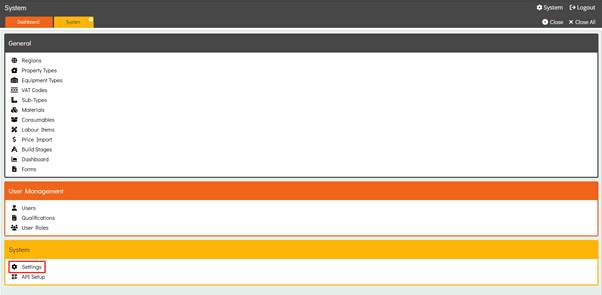
Settings
The Settings area is located within the System section of System.
Details
Upon entering Settings, users are automatically directed to the Details sub-tab.
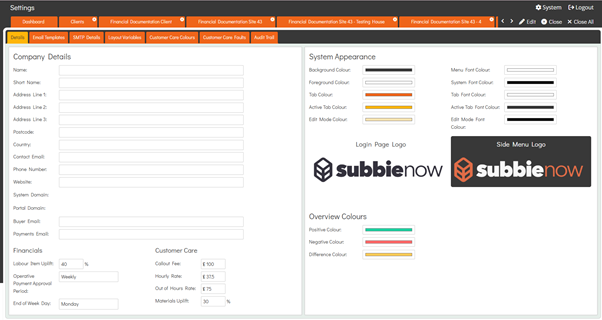
This area allows users to input company and financial information and also configure system appearance settings, such as the login page logo, side menu logo, and colour options for the background, tabs, and fonts across the system.
The Buyer Email is the address that will receive the Purchase & Credit Orders emails, these are sent out once an order has been approved & sent.
The Payments Email is the address that will receive the Payslips for the Operatives, Contract Managers & Customer Care Engineers.
Towards the bottom of the Details page the user can set their Financial & Customer Care settings.
Financials
- The ‘Labour Item Uplift’ is the percentage that is added to the Labour Item ‘Cost’ at the Plot Level.
- The ‘Operative Payment Approval Period’ can be set to either Weekly or Monthly. If set to Weekly, an End of Week Day must also be specified. This setting determines the period in which approved Work Submissions are eligible for payment, based on their Submission Date.
- The ‘End of Week Day’ dropdown lists all days of the week. The selected day serves as the cutoff point for submissions within that week.
Customer Care
- The Customer Care ‘Callout Fee’ is the amount that is added to the Customer Care ‘Invoice Value’ when a Customer Care Engineer attends a job.
- ‘Hourly Rate’ is the amount that the company charges per hour for a Customer Care job during regular work hours.
- The ‘Out of Hours Rate’ is how much the company charges per hour for a Customer Care job that is occurring outside of their regular work hours.
- ‘Materials Uplift’ is the percentage that is added on to the Customer Care Materials that are associated with the job.
Overview Colours
The user can configure Positive, Negative, and Difference Colours to colour code the relevant Materials or Labour Items for Plot-Level Plots within the House Type Plot Overview, Client Overview & Site Overview allowing users to easily identify differences and statuses based on colour.
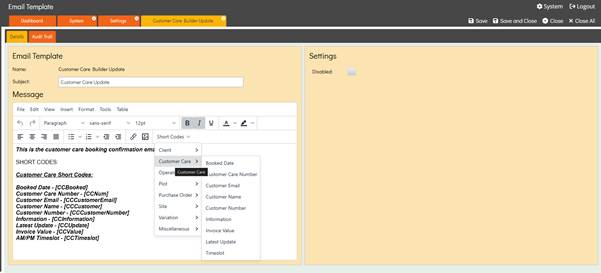
Email Templates
Within Settings Email Templates, the system provides automatically generated template records with fixed names. Users can open each template and edit its content as needed. Each template includes a set of short codes, which can be used to automatically insert dynamic information such as order or quote details etc.

Layout Variables
The Layout Variables section allows users to create template values that can later be inserted into a Form Layout.
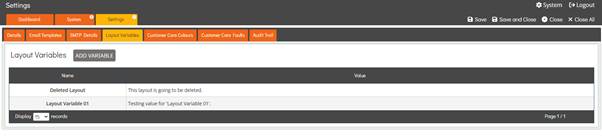
When creating a new Layout Variable, the record includes two fields: Name and Value. The text entered in the Value field is the content that will be inserted into the Form Layout.

To delete an existing Layout Variable the user must have the relevant System Access permissions. To perform the action, the user must enter Edit mode and select the Delete button located in the top right corner.
Deleted Contact records appear highlighted in red within the list table to clearly indicate their status. Only users with Super User permissions can view deleted records.
These records can be restored by opening the deleted record and selecting the Restore button located in the top-right corner.

Customer Care Colours
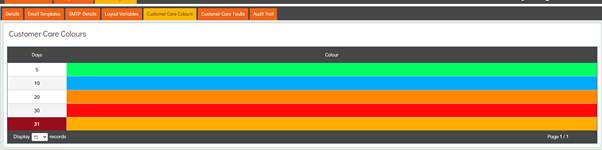
The Customer Care Colours sub-tab within Settings allows users to define colour codes for Customer Care records based on the number of days a Customer Care job has been open.
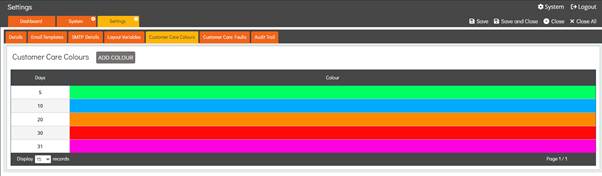
To add a new colour the user can enter Edit mode and select Add Colour, the system will then direct them to the Details page to specify the number of days and colour.

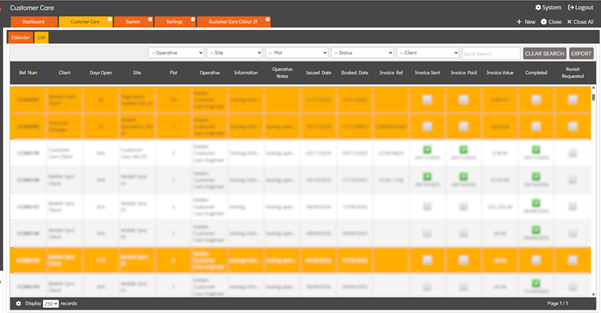
All Customer Care Colours are applied to the Customer Care List view.
To delete an existing Customer Care Colour the user must have the relevant System Access permissions. To perform the action, the user must enter Edit mode and select the Delete button located in the top right corner.
Deleted Customer Care Colours records appear highlighted in red within the ‘Days’ column in the list table to clearly indicate their status. Only users with Super User permissions can view deleted records.
These records can be restored by opening the deleted record and selecting the Restore button located in the top-right corner.
Customer Care Faults
The Customer Care Faults sub-tab within Settings allows users to create predefined customer care fault types. These can then be selected by operatives when completing a Customer Care form to specify who was responsible for the fault.
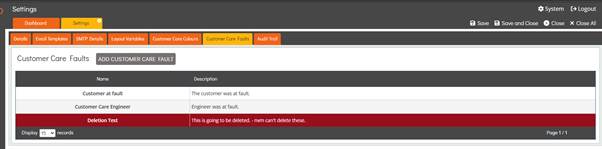
To add a new Customer Care Fault, enter edit mode and select the Add Customer Care Fault button, the system then directs the user to the Details page where the user can enter a Name and Description.

To delete an existing Customer Care Fault the user must have the relevant System Access permissions. To perform the action, the user must enter Edit mode and select the Delete button located in the top right corner.
Deleted Customer Care Fault records appear highlighted in red within the list table to clearly indicate their status. Only users with Super User permissions can view deleted records.

These records can be restored by opening the deleted record and selecting the Restore button located in the top-right corner.