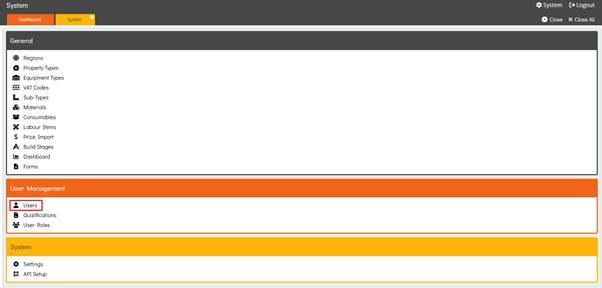
Users
The Users area, located within the User Management section of System, allows users to create, edit, and delete User records. All user setup and management within the system is performed in this area.
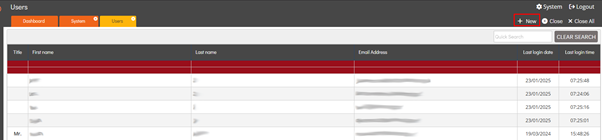
The Users area contains a Quick Search which targets the First Name & Last Name columns.
To create a new User record the user must select ‘+ New’ in the top right corner.
The system directs the user to the User Details page.
User Details
Within the Details page the user can populate the following information.
- Title
- First Name
- Last Name
- Email Address
- Telephone
- Mobile Number
- User Type:
- Standard – This is the User Type required for a valid login to the admin system. The Standard User Type cannot login to the portal or mobile application.
- Operative – The Operative User Type is needed to login to the portal or mobile application as an Operative. The Operative User Type cannot login to the admin system.
- Customer Care Engineer – The Customer Care Engineer User Type is needed to login to the portal or mobile application as a Customer Care Engineer. The Customer Care Engineer User Type cannot login to the admin system.
- Contracts Manager – The Contracts Manager User Type is needed to login to the portal or mobile application as a Contracts Manager. The Contracts Manager User Type cannot login to the admin system.
- Regions – List of regions from the Regions area.
- User Sites – Lists sites from the Sites area. If this multiselect field is populated, the user’s visibility within the Sites area will be limited to the selected sites only.
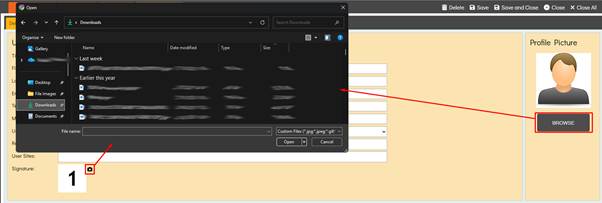
If the user selects the camera icon next to Signature, the system will open the file explorer, allowing them to upload an image of their signature.
To upload a Profile Picture, the user must select the Browse button located below the default image. The system will open the user’s file explorer, allowing them to choose and upload an image.
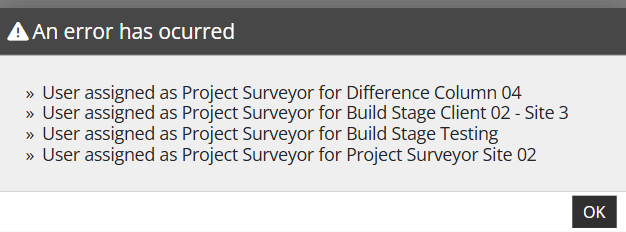
To delete a User record, select the Delete button in the top-right corner. However, if the user is assigned as a Project Surveyor within any Sites, the system will prevent deletion until the Project Surveyor assignment is changed.
User System Access
The System Access tab displays a row for each system area, containing three checkboxes: View, Add/Edit, and Delete. The status of these checkboxes determines the level of access the user has within each specific area.

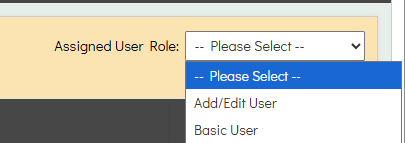
The Assigned User Role dropdown, located in the top-right corner, lists all non-deleted User Roles within the system. When a role is selected, the system automatically applies the permissions associated with that role to the user.
An explanation of each checkbox and its function is provided below.
- View – The status of the View checkbox determines whether the user has permission to access and view the area within the system.
- Add/Edit – The status of the Add/Edit checkbox determines whether the user has permission to create or modify records within that area.
- Delete – The status of the Delete checkbox determines whether the user has permission to delete records within that area.
User Switches
The User Switches tab contains three sections of checkboxes that define user visibility and functionality permissions within the system.
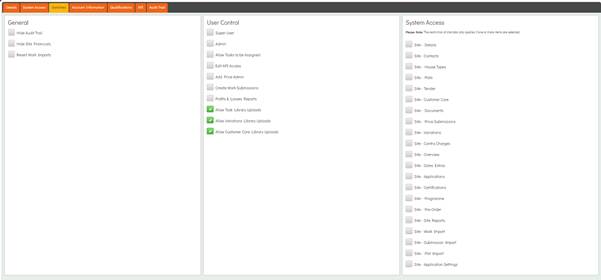
General
- The status of the Hide Audit Trail switch determines whether the user can view the Audit Trail tab throughout the system.

- The status of the Hide Site Financials switch determines whether the user can view the financial data in the Sites table and the Financials sub-tab within a Site.


- The status of the Revert Work Imports switch determines whether the user has permission to perform a Revert Work Import within the Work Import sub-tab of a site.

User Control
- The status of the Super User switch determines whether the user can view deleted records throughout the system.
- The Admin switch controls access to several advanced features and visibility settings within the system. When the Admin switch is enabled, the user can:
- View the SMTP Details sub-tab in the Settings area
- Access the API Setup area
- View all Clients in the system, including inactive ones (not limited to Active Clients)
- Add Qualifications in the User Qualifications area
- Access the Break Plot Link button on Master or Site Level Plots within the Plot Details page
- When the Admin switch is disabled, these features and permissions are not available to the user.
- The status of the Allow Tasks to be Assigned switch determines whether an Operative or Contracts Manager is able to assign a task to that specific user.
- The status of the Edit API Access switch determines whether the user is able to access the API sub-tab within a User record.

- The status of the Add Price Admin switch determines whether the user can add or modify material costs within the Materials Availability & Client Materials areas.
- The status of the Create Work Submissions switch determines whether the user has access to the + New button within the Work Submissions area.

- The status of the Profits & Losses Reports switch determines whether the user can access the P&L Report within the Sites area.

- The status of the Allow Task Library Uploads switch determines whether the user can upload photos to Tasks on the Mobile Application from their Photo Library.
- The status of the Allow Variations Library Uploads switch determines whether the user can upload photos to Variations on the Mobile Application from their Photo Library.
- The status of the Allow Customer Care Library Uploads switch determines whether the user can upload photos to Customer Care items on the Mobile Application from their Photo Library.
System Access
Each System Access switch corresponds to a sub-tab within a site. The status of these switches determines which sub-tabs are visible to the user when accessing a site. Site sub-tab visibility is only restricted when one or more System Access checkboxes are selected. If no checkboxes are enabled, the user will have access to all sub-tabs.

User Account Information
The Account Information sub-tab provides users with key details and management options related to their account activity and security settings.
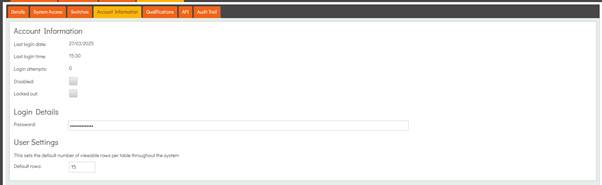
Last Login Date and Last Login Time display when the user most recently accessed the system.
Login Attempts indicates the number of consecutive unsuccessful login attempts made by the user and automatically resets to 0 upon a successful login.
The Disabled checkbox controls the activation status of the user account. When enabled, the account becomes inactive, preventing the user from logging in or accessing the system.
Similarly, the status of the Locked Out checkbox determines whether the user can log in to the system. When this checkbox is enabled, the user’s access is restricted. The system automatically enables this checkbox after more than three consecutive unsuccessful login attempts.
The Password field within the Login Details section allows administrators to update a user’s password. To change it, enter the new password and save the record.
Finally, the Default Rows dropdown within the User Settings section allows the user to set the default number of viewable rows per table throughout the system, this can also be altered through My Account.
User Qualifications
The User Qualifications sub-tab allows Adding, Editing & Deleting Qualifications against a User record.

This area contains a Quick Search which targets the Qualification column.
To add a qualification, select the Add Qualification button which is located on the right-hand side above the table.
The system directs the user to the User Qualification Details page to select a Qualification and enter an Accredited Date & Expiration Date.
User Qualification Details

The Qualifications in the Qualification dropdown are derived from the system Qualifications area.
The Accredited Date is an editable date selector that allows the user to select any date representing when the Qualification was accredited.
The Expiration Date is an editable date selector that allows the user to select any date representing when the Qualification expires.
User Qualification Images
The User Qualification Images section allows users to Add, Edit, and Remove Images associated with the Qualification.
This section includes a Quick Search feature that targets the Image Name column.
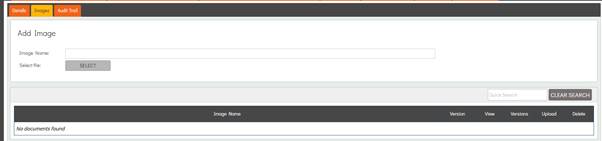
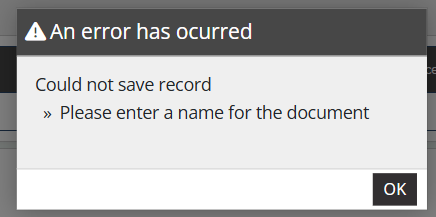
An Image Name is required to proceed with an upload. If a user attempts to upload an image without providing an Image Name, the system will prevent the upload and display an error prompting the user to enter an Image Name.
To upload an image to the Qualification, the user can enter Edit mode and populate the Image Name field with the desired Name. The user can then select the SELECT button, which will open the File Explorer to allow a file to be selected. Once a file is chosen, it will be uploaded to the User Qualification and be displayed in the table.
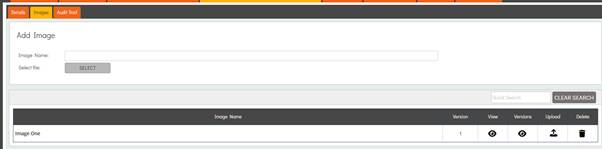
To upload a new version, the user must enter Edit mode and select the icon in the Upload column. This opens the user’s File Explorer, allowing a new file to be selected and uploaded as the most recent version.
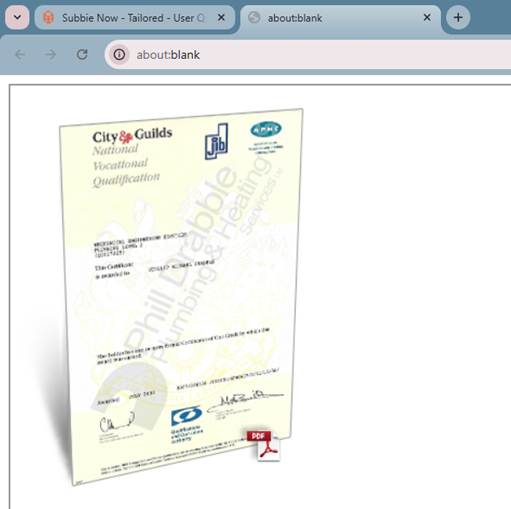
To View an existing Image, the user can select the icon in the View column for the desired image, which will open a new browser tab displaying the most recent version.
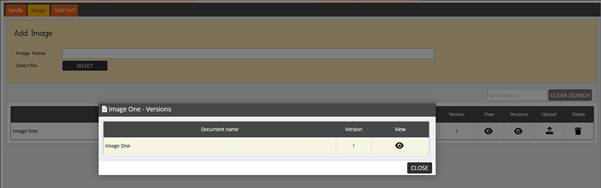
Alternatively, the user can select the icon in the Versions column to view a table containing all Versions of the Image. From this table, the user can select the icon in the View column to open a new browser tab displaying the selected version of the file.
To Delete an existing Image, the user must enter Edit mode and select the icon in the Delete column. The system will display a confirmation dialog warning that deleting the document and all its versions is permanent. Once Yes is selected, the Document is deleted and cannot be recovered.
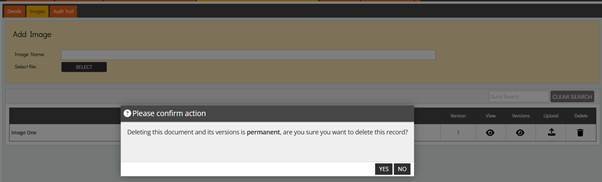
Deleted Documents are permanently removed from the Variation Images table and cannot be viewed or accessed in any way.
User API
The API tab within Users allows system administrators to control mobile application access for each user. By enabling or disabling the Allow App Access option, administrators can determine whether the user has permission to log in and use the mobile application.

Once a User has registered via the app, the API Tokens & Connection section will change to show their current connection status of the User. This will refresh hourly if the app has an active connection to the server, otherwise it will change to a red “Disconnected” status.

Qualifications
The Qualifications area, located under the User Management section in System, allows users to create predefined qualifications. These qualifications can then be assigned to users within the system.
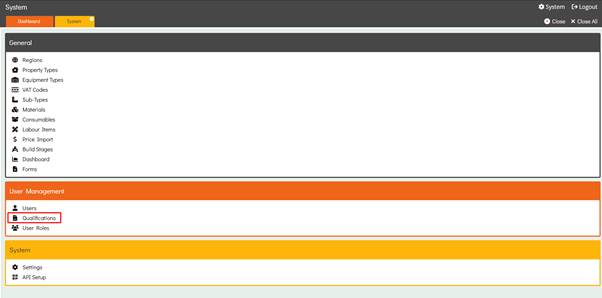
The Qualifications area contains a Quick Search which targets all of the columns.
To add a new Qualification, select the ‘+ New’ button in the top right corner.

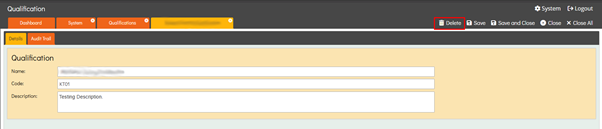
The system directs the user to the Qualification Details page where a Name, Code & Description can be entered for the Qualification.

Qualifications can be edited at any time by opening the record and updating the relevant information.
To remove a qualification, the user must use the Delete button located in the top-right corner of the record. The system will prevent users from deleting Qualifications if they have already been assigned to a User record.
User Roles
The User Roles area, located under the User Management section in System, allows administrators to create predefined roles with specific system access permissions and configuration settings that can be assigned to users.
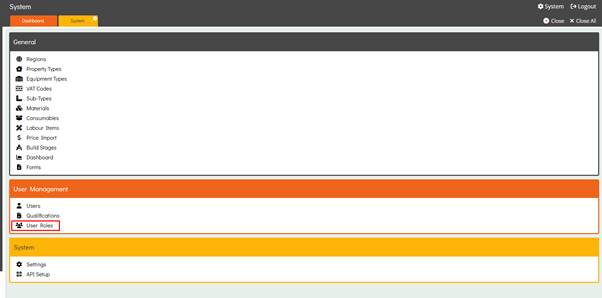
The User Roles area contains a Quick Search which targets the Name column.
To add a new User Role, select the ‘+ New’ button in the top right corner.

The system directs the user to the User Roles Details page to enter a Name, Code & Additional Information for the User Role.

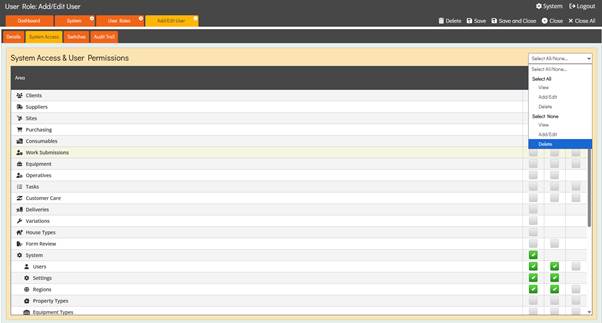
User Role System Access
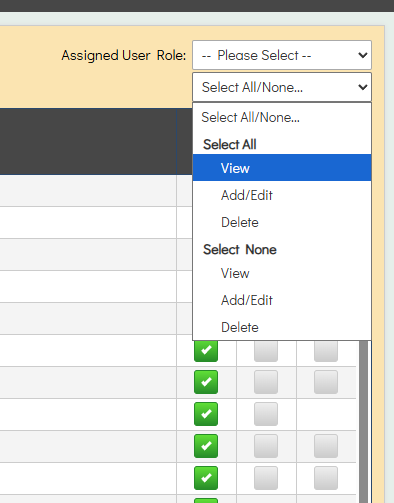
The System Access sub-tab displays a row for each system area, containing three checkboxes: View, Add/Edit, and Delete. The status of these checkboxes defines the level of access granted to users assigned to the role within each specific area.
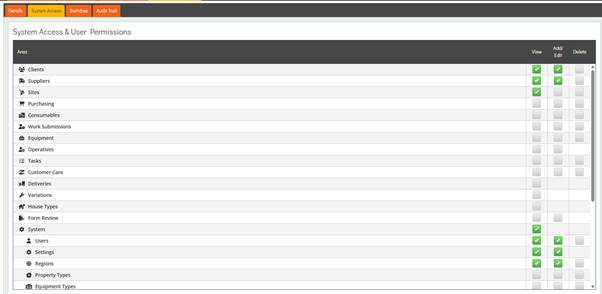
Upon entering Edit mode, a dropdown will appear above the right-hand side of the table named Select All/None. The Select All/None dropdown provides Select All and Select None options for each checkbox column in the table. Selecting Select All enables all checkboxes within the chosen column, while selecting Select None disables them.
User Role Switches
The User Switches tab contains three sections of checkboxes that define user visibility and functionality permissions within the system.
General
- The status of the Hide Audit Trail switch determines whether the user that the role is assigned to can view the Audit Trail tab throughout the system.

- The status of the Hide Site Financials switch determines whether the user that the role is assigned to can view the financial data in the Sites table and the Financials sub-tab within a Site.


- The status of the Revert Work Imports switch determines whether the user that the role is assigned to has permission to perform a Revert Work Import within the Work Import sub-tab of a site.

User Control
- The status of the Super User switch determines whether the user that the role is assigned to can view deleted records throughout the system.
- The Admin switch controls access to several advanced features and visibility settings within the system. When the Admin switch is enabled, the user can:
- View the SMTP Details sub-tab in the Settings area
- Access the API Setup area
- View all Clients in the system, including inactive ones (not limited to Active Clients)
- Add Qualifications in the User Qualifications area
- Access the Break Plot Link button on Master or Site Level Plots within the Plot Details page
- When the Admin switch is disabled, these features and permissions are not available to the user.
- The status of the Allow Tasks to be Assigned switch determines whether an Operative or Contracts Manager is able to assign a task to the user that the role is assigned to.
- The status of the Edit API Access switch determines whether the user that the role is assigned to is able to access the API sub-tab within a User record.

- The status of the Add Price Admin switch determines whether the user that the role is assigned to can add or modify material costs within the Materials Availability sub-tab or the Client Materials sub-tab.


- The status of the Create Work Submissions switch determines whether the user that the role is assigned to has access to the + New button within the Work Submissions area.

System Access
Each System Access switch corresponds to a sub-tab within a site. The status of these switches determines which sub-tabs are visible to the user that the role is assigned to when accessing a site. Site sub-tab visibility is only restricted when one or more System Access checkboxes are selected. If no checkboxes are enabled, the user will have access to all sub-tabs.
To delete a User Role, the user must open the desired record in Edit mode and select the Delete button located in the top-right corner. However, if the role is currently assigned to any users, the system will prevent deletion until it has been unassigned from all associated user accounts.

My Account
The My Account area, located at the bottom of the side menu, allows the logged-in user to update their personal details, including Title, First & Last Name, Email Address, Password, and Default Row settings.
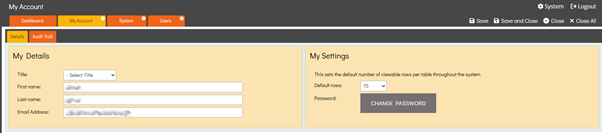
The Default Rows dropdown within the User Settings section allows the user to set the default number of viewable rows per table throughout the system, this can also be altered through User Account Information.
To change their password, the user must select the Change Password button, which will display the Change Password popup.
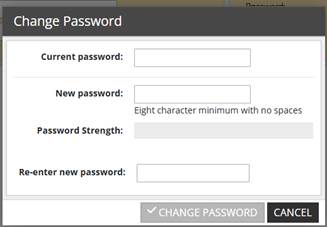
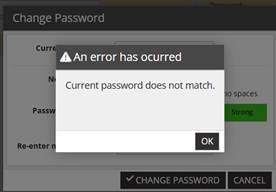
The user must enter their Current password to proceed with changing their password. If the entered password does not match the existing one, the system will display an error message indicating that the current password is incorrect.
The New Password field is where the user enters their new password. Passwords must contain a minimum of eight characters and include both upper- & lower-case letters, special characters, numbers and cannot include spaces. As the user types, the Password Strength indicator will classify the password as Weak, Moderate, or Strong. To proceed with the password change, the password must be classified as Strong; otherwise, the Change Password button will remain greyed out and disabled.
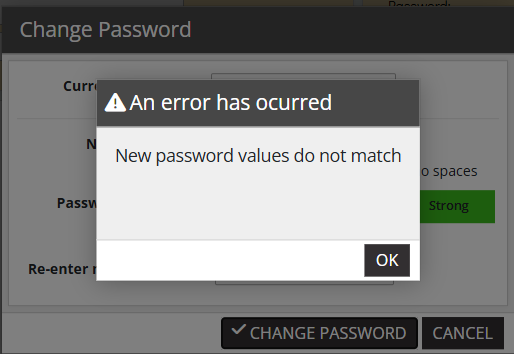
The user must re-enter their new password in the Re-enter New Password field for security and confirmation purposes. If the value entered does not match the New Password field, and the user attempts to proceed, the system will display an error message indicating that the passwords do not match.
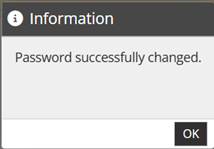
Once all password requirements are met, the user can successfully change their password. The previous password will then become invalid and can no longer be used for login.