Sites House Types
The House Types section allows users with the appropriate System Access permissions to Add, Edit, and Remove House Types for the selected Site.
A Quick Search function is available within this section, allowing users to filter results based on the House Type and Display Name columns.
The House Types table displays all non-deleted House Types that have been created for the associated Client within the Client House Types area.

Adding and Removing House Types
To add a House Type to the Site, users can enter Edit mode and select the + icon next to the desired House Type. The system will then move the selected House Type to the Selected House Types table and remove it from the House Types table.

Selected House Types are then available for selection when creating Plots for the Site.
When a House Type is first added to the Site, the Level column in the Selected House Types table will display Master. This indicates that the House Type remains aligned with the Client Level House Type, sharing the same Materials, Labour, Build Stages, Sub-Types, and Suppliers.
Master Level House Types will inherit changes from the Client House Type until the alignment between the Client and Site is broken.
If Materials, Labour, Build Stages, Sub-Types and Suppliers are added, removed or edited which results in the House Type no longer being aligned with the Client House Type, the Level column within the table will change to Site and the House Type will no longer inherit changes from the Client House Type.

A selected House Type can be returned to Master Level by linking it back to the Master House Type from the Site House Type Details page.
To remove a House Type from the Site, users can enter Edit mode and select the – button next to the desired House Type in the Selected House Types table. The system will then move the House Type back to the House Types table, making it available for selection again.

If a House Type is removed from the Site and then selected again, it will be added at the Master Level.
House Types cannot be removed from the Site if they have been used to create Plots.
If a user attempts to remove a House Type that is already in use, the system will prevent the action and display an error message indicating that House Types used for Plots cannot be removed.

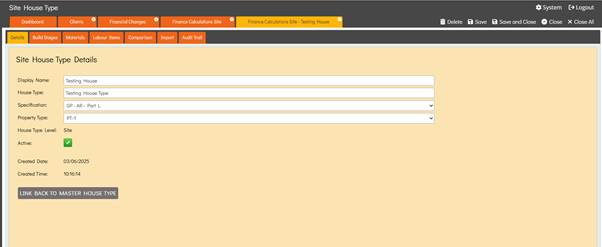
House Types Details
The House Type Details page allows users to enter and manage information for a House Type, including the Specification, and Property Type.
The Display Name and House Type fields are read-only at the Site Level. These values are defined at the Client level.
The House Type Level will either display Master or Site depending on the current level of the selected House Type.
The status of the Active checkbox decides whether the House Type will appear for selection when creating Plots, if the box is unchecked the House Type will be hidden from the House Type dropdown within the Site’s Plots page.
If a user updates a selected House Type so that it realigns with the Client House Type, a Link Back To Master House Type button will appear on the Site House Type Details page. Selecting this option will return the House Type to Master level, allowing it to once again inherit changes from the Client House Type.
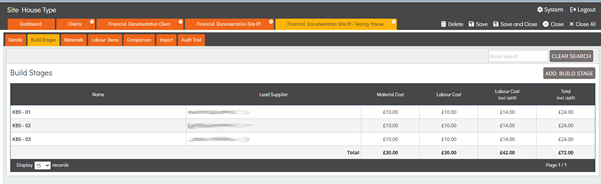
House Types Build Stages
The Site’s House Type Build Stages section allows users to Add, Edit, or Delete Build Stages associated with the selected House Type. Users with the relevant System Access permissions can edit a House Type at any time by selecting the desired record from the list table.
This section contains a Quick Search which targets the Name column.
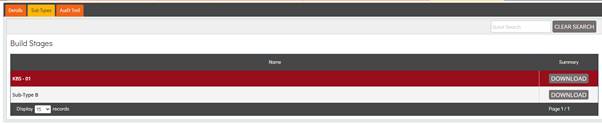
The Build Stages table consists of six columns that provide key information for each build stage. An explanation of each column is provided below.
- Name – This is the name of the Build Stage that has been added.
- Lead Supplier – This represents the Supplier that has been selected for the Build Stage.
- Material Cost – This figure represents the total cost of all Materials added to the build stage.
- Labour Cost – This figure represents the total cost of all Labour Items added to the build stage, excluding any labour item uplift.
- Labour Cost (incl. Uplift) – This figure represents the total cost of all labour items added to the build stage, including any applicable labour uplift. The uplift is a percentage defined on the Settings Details page.
- Total (incl. Uplift) – This figure represents the combined total of material costs and labour costs, including any applicable labour uplift.
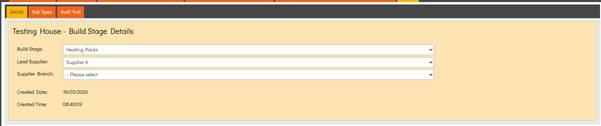
To add a new build stage, the user must enter Edit mode and select the Add Build Stage button located above the top-right corner of the table.
Once selected, the user is directed to the Build Stage Details page, where a build stage can be chosen from a dropdown list pre-populated from the System Build Stages area.

After selecting a build stage from the dropdown, an additional dropdown labelled Lead Supplier appears. This dropdown is pre-populated with Suppliers that have been added to the client in the Clients Suppliers area.

Once a Lead Supplier has been selected, an additional dropdown labelled Supplier Branch appears below. This dropdown is pre-populated with Supplier Branches that have been added in the Supplier Branches area. Selection of a Supplier Branch is optional and may be left blank if not required.
Supplier Branches represent subsets of a Supplier. When a Lead Supplier Branch is selected, it is automatically defaulted as the supplier branch for the build stage when a Purchase Order or Credit Order is created. Supplier Branch is not mandatory, however if one is selected the system will send all Purchase & Credit Order emails for that build stage to the selected Supplier Branch Email Addresses rather than the Lead Supplier Email.
Once the Build Stage setup is complete, it becomes available for the user to begin adding Sub Types, Materials, and Labour Items.
Users with appropriate permissions can delete Build Stages by entering Edit mode within the Build Stage record and selecting the Delete button located in the top-right corner.
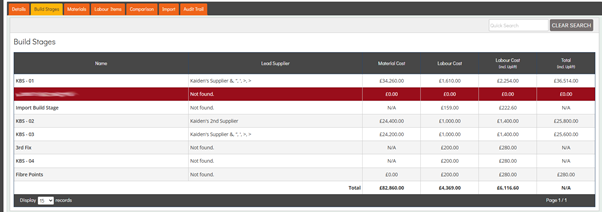
Deleted Build Stage records appear highlighted in red within the list table to clearly indicate their status. Only users with Super User permissions can view deleted records. These records can be restored by opening the deleted record and selecting the Restore button located in the top-right corner.
House Types Sub-Types
An optional feature of Build Stages is the use of Sub Types. Sub types effectively act as Build Stages within a Build Stage and can have Materials and Labour Items assigned to them. This allows users to more accurately control and target where orders and submissions are placed.
The Sub-Types section can be accessed by navigating to the sub-tab within the Build Stage record. This area contains a Quick Search which targets the Name column.

Each Build Stage includes a default Sub Type, which automatically shares the same name as the Build Stage itself.
If a Sub Type is manually added to a Build Stage, the system automatically deletes the default Sub Type.
However, if the default Sub Type already has Materials or Labour Items assigned to it, the default Sub Type is retained and the newly added Sub Type is created alongside it.
Users with the relevant System Access permissions can edit a Sub-Type at any time by selecting the desired record from the list table.
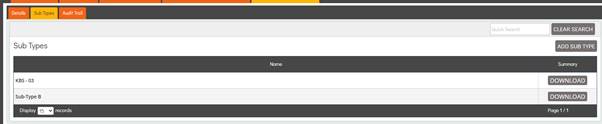
To add a new Sub Type, the user must select the Add Sub Type button located above the top-right corner of the table.
The system then directs the user to a new Sub-Type record on the Details page, where the user can specify a Name for the Sub Type and set its Order.

The options in the Name dropdown are sourced from System Sub Types and include all non-deleted Sub Types in the system.
The Order value ranges from 1 to 99 and this determines the position of the Sub Type within the Sub-Types list table, controlling the sequence in which Sub Types are displayed.
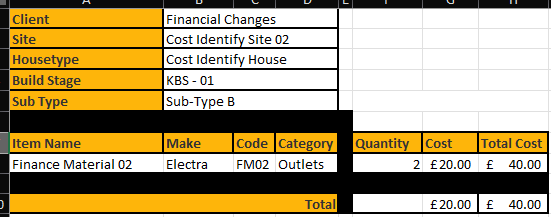
Each Sub Type in the list table includes a Download button. Clicking this button downloads an Excel file containing the pricing data for that specific Sub Type.
The Excel file includes details such as Item Names, Make, Code, Category, Quantity, Cost & Total Cost.
Users with appropriate permission can delete Sub-Types by entering Edit mode within the Sub-Type record and selecting the Delete button located in the top-right corner.
Deleted Sub-Type records appear highlighted in red within the list table to clearly indicate their status. Only users with Super User permissions can view deleted records. These records can be restored by opening the deleted record and selecting the Restore button located in the top-right corner.
House Types Materials
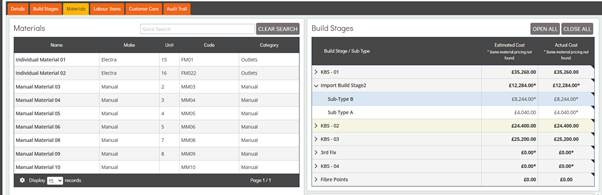
The Materials section displays all Materials associated with the Client and allows users to assign them to the relevant Sub Types. The Materials are associated with the Client either through the System Price Import area or the Materials Availability tab.
This section includes a Quick Search feature that allows users to search for Materials by Name, Make, Code, or Category.
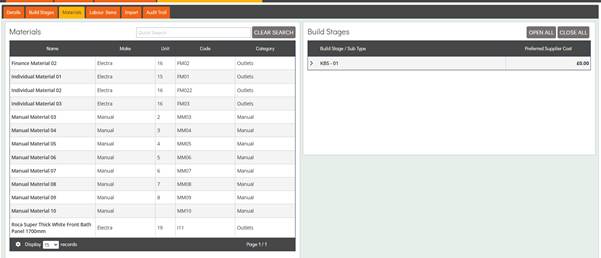
Users can select individual Sub Types within the Build Stages to display the Materials list table for a specific Sub Type. Alternatively, users can select Open All to display the Materials list tables for all Sub Types within the House Type. Selecting Close All hides all Materials list tables for each Sub Type.
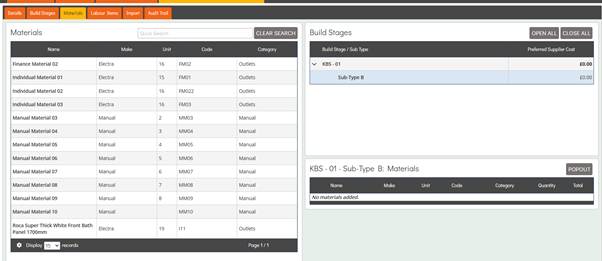
A cog icon is located in the bottom-left corner of the Materials table footer. Selecting this icon opens a configuration pop-up containing a series of checkboxes. The Name and Code checkboxes are read only and cannot be edited as these two columns include required information.
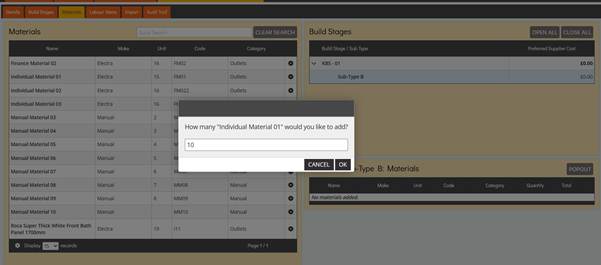
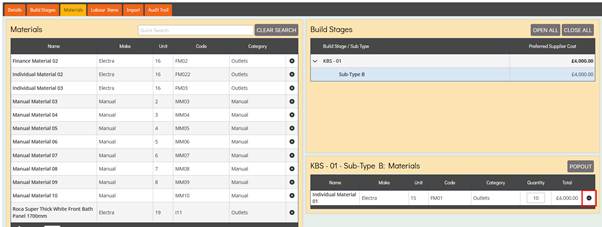
To add a Material to a Sub Type, the user must enter Edit mode. A + icon then appears next to each material in the table.
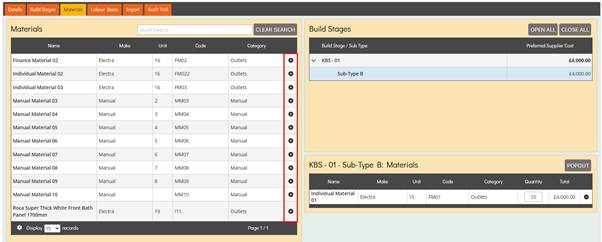
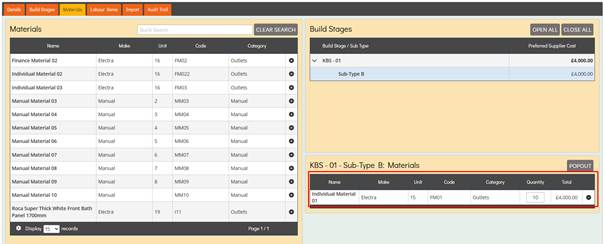
Selecting the + icon opens a Quantity selection pop-up. Once the desired quantity is entered and OK is selected, the Material is added to the currently selected Sub Type.
If a Material is added to a Sub-Type but does not have an assigned Cost for the selected Lead Supplier, the system will display an asterisk (*) in the Preferred Supplier Cost column and show the message “Some material pricing not found.”
An asterisk will also appear next to the Cost figures for any affected Sub-Type where pricing is missing. This helps users quickly identify which items require pricing to be assigned and resolve any missing cost information.
The list table automatically calculates the Total Cost for added Materials based on the Preferred Supplier. This is calculated by multiplying the Material’s Current Cost by the selected Quantity. If the Cost for a Material is altered the Total Cost would automatically inherit the new cost and re-calculate the total value.
The Preferred Supplier Cost column displays the Current Cost of each Build Stage & Sub-Type, based on the Preferred Supplier.
Users can select the Popout button for a specific Sub Type to open a new browser tab displaying a read-only view of the Materials list table for that Sub Type. This is useful when navigating elsewhere in the system for comparison purposes.

Users can alter the Quantity for a Material at any time by simply changing the value in the Quantity field.
To remove a Material from a Sub Type, the user must enter Edit mode. Upon doing so a – icon then appears next to each Material in the Sub-Types Materials list table.
Selecting the – icon removes the Material from the Sub Type and returns it to the Materials list, making it available for selection again.
Any Materials that are added, removed, or modified at the Client level will cascade down to all Master Site House Types and Plots that are still inheriting from the Client.
If a House Type is set to Site Level, it no longer inherits Materials from the Client. The same applies to Plots that are set to Site Level or Plot Level.
Additionally, if Materials have already been ordered at the Plot level, reducing the Quantity at a higher level will not reduce the Plot Level Quantity below the amount already ordered.
House Types Labour Items
The Labour Items section displays all Labour Items from the System Labour Items area and allows users to assign them to the relevant Sub Types.
This section includes a Quick Search feature that allows users to search for Labour Items by Name & Category.
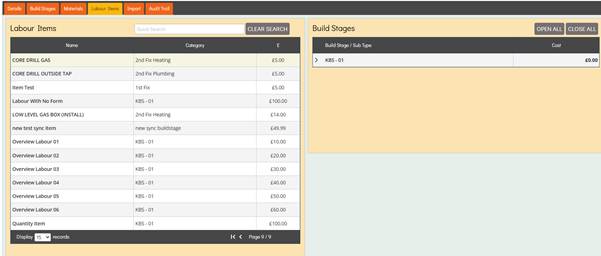
Users can select individual Sub Types within the Build Stages to display the Labour Items list table for a specific Sub Type. Alternatively, users can select Open All to display the Labour Items list tables for all Sub Types within the House Type. Selecting Close All hides all Labour Items list tables for each Sub Type.
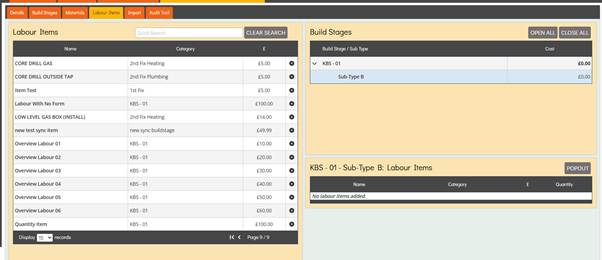
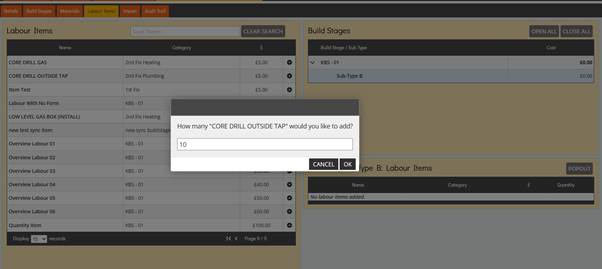
To add a Labour Item to a Sub Type, the user must enter Edit mode. A + icon then appears next to each Labour Item in the table.
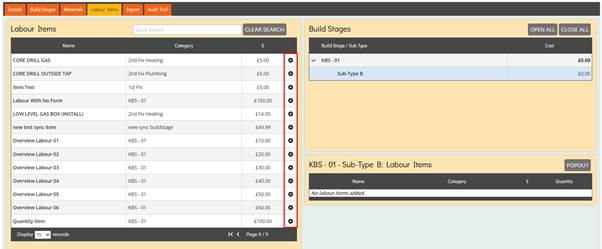
Selecting the + icon opens a Quantity selection pop-up. Once the desired quantity is entered and OK is selected, the Labour Item is added to the currently selected Sub Type.

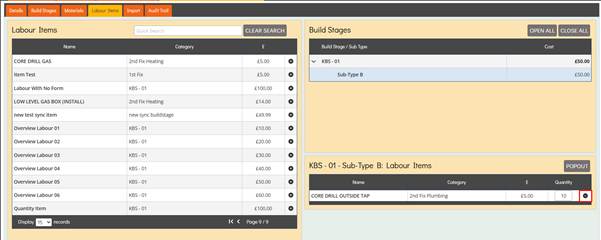
The list table automatically calculates the Total Cost for added Labour Items. This is calculated by multiplying the Labour Item Current Cost by the selected Quantity. If the Cost for a Labour Item is altered the Total Cost would automatically inherit the new cost and re-calculate the total value.
Users can select the Popout button for a specific Sub Type to open a new browser tab displaying a read-only view of the Labour Items list table for that Sub Type. This is useful when navigating elsewhere in the system for comparison purposes.

Users can alter the Quantity for a Labour Item at any time by simply changing the value in the Quantity field.
To remove a Labour Item from a Sub Type, the user must enter Edit mode. Upon doing so a – icon then appears next to each Labour Item in the Sub-Types Labour Item list table.
Selecting the – icon removes the Labour Item from the Sub Type and returns it to the Labour Item list, making it available for selection again.
Any Labour Items that are added, removed, or modified at the Client level will cascade down to all Master Site House Types and Plots that are still inheriting from the Client.
If a House Type is set to Site Level, it no longer inherits Labour Items from the Client. The same applies to Plots that are set to Site Level or Plot Level.
Additionally, if Labour Items has already had a Work Submission made against it at the Plot level, reducing the quantity at a higher level will not reduce the plot-level quantity below the amount already submitted.
House Types Comparison
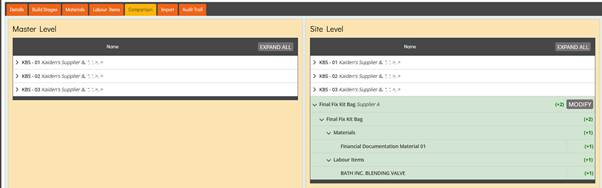
The House Types Comparison section provides a side-by-side view of Build Stages, Sub-Types, Materials, and Labour Items at both the Master Level and the Site Level.
The Master Level represents the Client House Type, while the Site Level represents the Site House Type.

The Build Stages are presented in an accordion-style layout. Selecting a Build Stage will expand it to display all associated Sub-Types.

Users can then select a Sub-Type to reveal options for Materials and Labour, allowing them to view the corresponding Material and Labour Items within that Sub-Type.
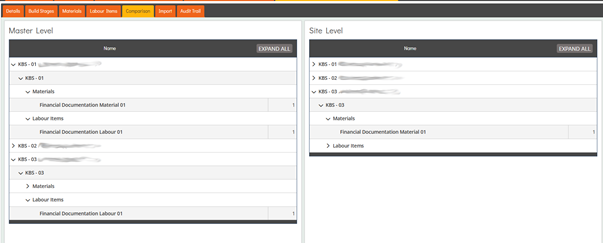
Alternatively, users can select the Expand All option located within the header of the table, to display all Build Stages, Sub-Types, and Material and Labour Items at once for easier viewing. Once expanded, this option changes to Collapse All, which can be selected to close all sections.

The Comparison highlights any differences between the Master Level and the Site Level, making it easy to identify where changes have occurred. Differences are indicated when there are changes such as Material or Labour Quantity adjustments, the addition or removal of Materials or Labour items, or when Build Stages or Sub-Types have been added or removed at either level.
If a Build Stage, Sub-Type, Material, or Labour Item has been added at either level, the corresponding row will be highlighted in green to indicate the addition. A green figure will also be displayed within the row, showing the quantity that has been added compared to the opposing level.
If a Build Stage, Sub-Type, Material, or Labour Item has been removed at either level, the corresponding row will be highlighted in red to indicate the removal. A red figure will also be displayed within the row, showing the quantity that has been removed compared to the opposing level.
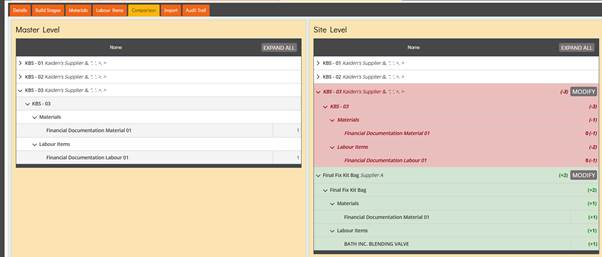
When a difference exists between the two levels, the row for the affected Build Stage will display a Modify button.
Selecting Modify opens a popup showing a side-by-side view of the Master and Site Levels for that Build Stage. The level where changes have been applied is highlighted with green (additions) or red (removals) rows and figures, while the opposing level is shown in standard grey/white rows.
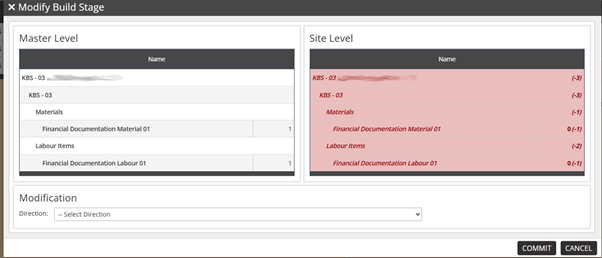
Within the popup, a Direction dropdown is available with two options: Master to Site and Site to Master.
Selecting Master to Site updates the Site level to match the Master level.
Selecting Site to Master updates the Master level to match the Site level.
Depending on the selected direction, the system will add, remove, or update items as needed to ensure both levels align. Any resulting changes are clearly indicated within the popup, with green rows for additions and red rows for removals.
House Types Import
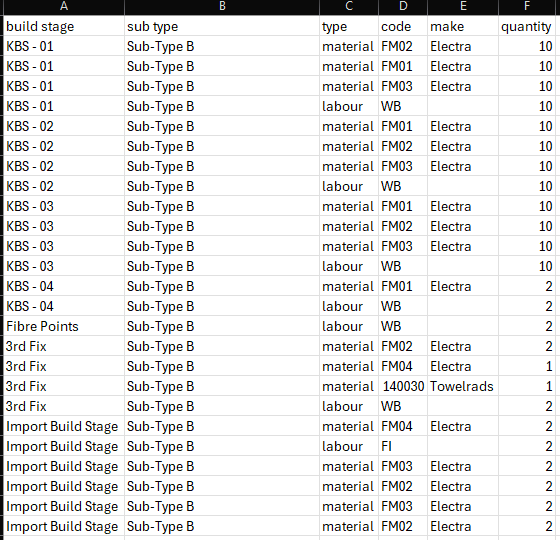
The Import section allows users to extract an Import Template which will contain each Build Stage, Sub-Type, Material & Labour Item on the House Type, this will also contain their Code, Make & Quantity. The user will then be able to add, remove, or alter the quantity for these and re-import the template, applying the changes to the House Type.
The user is able to download the template by selecting the Download Import Template button, the system extracts a CSV file which contains the relevant information.
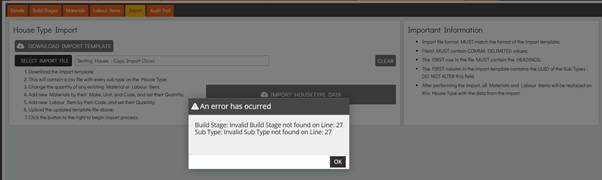
If multiple of the same Sub-Type exists on the same Build Stage, when the House Type Import is performed the system will reject the import and show an error message which informs the user that there’s multiple of the same Sub-Type on a Build Stage.

If the user uploads the wrong file by mistake, they can select the Clear button which will reset the Import File field to its default state.
Any Build Stages, Sub-Types, Materials, or Labour Items added via the House Type import must already exist within the system. If an invalid Build Stage, Sub-Type, Material, or Labour Item is included in the upload, the system rejects the import and identifies the location of the error within the CSV file.
Upon successfully importing the template all of the changes will be applied to the relevant items.
House Type Plot Overview
The House Type Plot Overview displays a view of all Plot-Level Plots associated with the selected House Type, allowing users to match the Plot-Level Plots to the House Type, by doing it as a whole or only matching individual lines.
The Plot Overview displays a tab for each Build Stage that exists on the House Type and Plot-Level Plots.
A table is displayed listing all Materials and Labour Items that exist on the House Type and Plot-Level Plots. Each section of the table is described below.
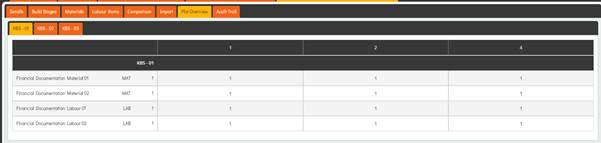
The left-hand side of the table displays the Material and Labour Item names, followed by either MAT or LAB, which identifies whether the item is a Material or Labour Item. A figure is then displayed representing the Quantity of the Material or Labour Item assigned to the House Type.
A column is displayed for each Plot-Level Plot, identified by its Plot Number. Each row then displays the corresponding Plot quantities for the Materials and Labour Items.
The table cells are colour coded based on the Positive, Negative, and Difference colours configured within Settings Details. The Positive colour is displayed when the Plot contains an additional item. The Negative colour is displayed when the Plot is missing an item. The Difference colour is displayed when the Plot contains the item, but the Quantity differs from the House Type.
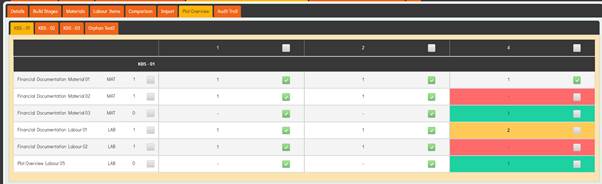
When the user enters Edit mode, checkboxes are displayed throughout the table to allow Materials and Labour Items to be matched from the House Type to the Plot-Level Plots.
A checkbox is displayed next to each Material and Labour Item row. Selecting this checkbox selects all available checkboxes across that row, matching the selected Material or Labour Item to all Plot-Level Plots.
A checkbox is also displayed next to each Plot Number column header. Selecting this checkbox selects all available checkboxes within that column, matching all Materials and Labour Items from the House Type to the selected Plot-Level Plot.
In addition, individual checkboxes are displayed next to each Quantity value within the table, allowing the user to selectively match specific Materials or Labour Items to individual Plot-Level Plots.
If a checkbox is already selected, it is displayed as disabled and cannot be deselected. This is because the Plot Overview is used only for matching items to the House Type and not for removing existing matches.